
Introduction
In the first part, we laid the foundations for understanding SCCM and its architecture. To truly understand SCCM in a way that is useful to a penetration tester or red team operator, you need to move beyond architecture diagrams and understand how it works on the technical level. From a top-down perspective, SCCM may just look like a database with a console manager on top, but it is a full system that automates the lifecycle of endpoints and that automation involves credentials, network services, and workflows that can contain juicy secrets for exploitation.This second part goes deeper into SCCM, discussing collections and their variables, network access accounts (NAAs), task sequences - ending by discussing the processes of OS deployments and PXE booting.
Collections and Variables
Collections are the logic groupings of resources - devices or users - within SCCM/MECM. They are used to target deployments, define compliance baselines and scope various administrative actions. A collection can be classed as dynamic where it is populated by WMI queries and AD attributes or static via manually assigned members.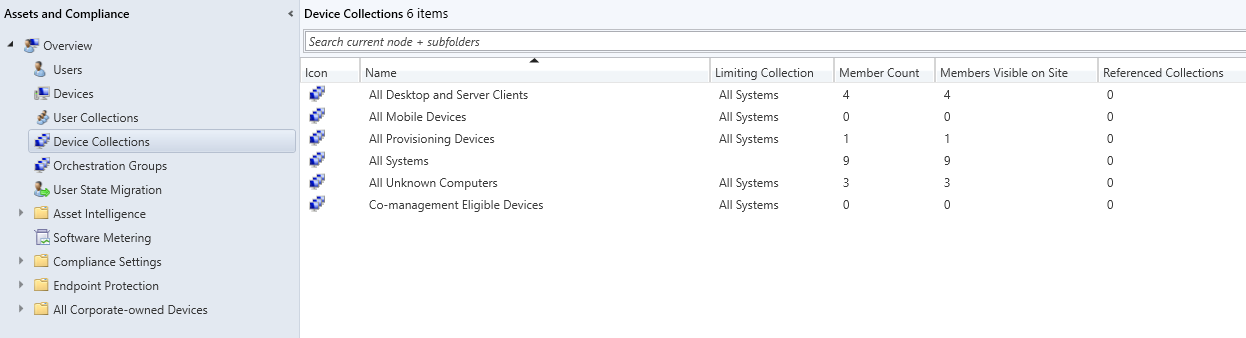
Device collections example
For flexible deployments, collections can also hold variables which function as parameters passed to task sequences, similiar to environment variables. As an example, a variable might specify a site code, a language pack, or a custom script parameter. The values stored inside are consumed during OSD to customize the behaviour, effectively turning SCCM into a conditional execution framework where the same task sequence can produce different results depending on which collection a device belongs to.
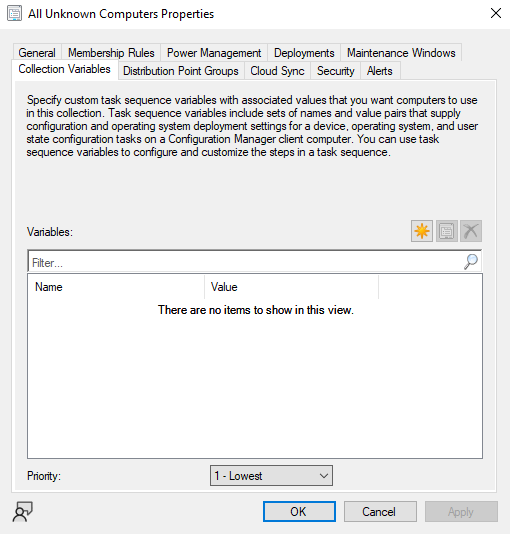
Collection variables window
Client Push Installation Credentials
The client-push method is meant to make life easier for system admins. Once the client is installed on an endpoint, it will use its machine account to authenticate back to the MP and DP for all communication. However, during the initial call, a fresh host cannot pull the agent down on its own using its machine account - something has to copy the binaries to the machine and execute them.That “something” is the
Client Push Account. These are dedicated service accounts configured on the site server to remotely install the SCCM agent on endpoints. For it to work (and interesting for red teamers!), the account must be a member of the local Administrators group on the target client machine. Using administrative rights, the site server connects to the client over SMB/RPC, copies the ccmsetup.exe bootstrapper into the ADMIN$ share, and then creates a service to execute it. Once the client is installed, the process switches to using the machine’s own domain credentials and the client push account is no longer involved.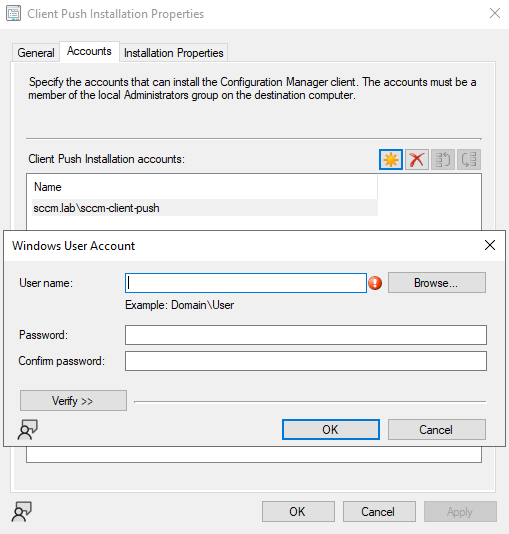
Client push installation properties
Even more intriguing, the Configuration Manager supports multiple client push accounts. When a push deployment is triggered, the site server will automatically attempt authentication with each account in turn. If the first account fails, it moves to the next, and continues down the list until one successfully authenticates.
This pattern exhibits the same behaviour as a credential spray using privileged accounts. From an attacker’s perspective, that is effectively what it is: a high-value set of domain accounts with administrative access across broad areas of the environment, stored centrally and automatically tested against endpoints until one works.
It’s important to note that client push accounts are not strictly required and there are safer alternatives: the SCCM client can be installed via Group Policy (MSI assignment), software update–based deployment through WSUS, logon scripts, or even manual installation to name a few. Each of these approaches removes the need for privileged service accounts to be scattered across endpoints, but client push persists as the “default” method because of its ease of use.
Network Access Accounts (NAAs)
When SCCM clients are domain-joined, they will authenticate to their designated distribution point using their machine account (e.g.CLIENT-SRF1$). But, in scenarios where the devices aren't domain-joined yet like bare-metal builds the system can't rely on machine accounts - hence NAAs are used.NAAs are a service account configured in SCCM that provides access to package content on DPs for non-domain joined machines. Its purpose is to enable content retrieval during early OSD stages.
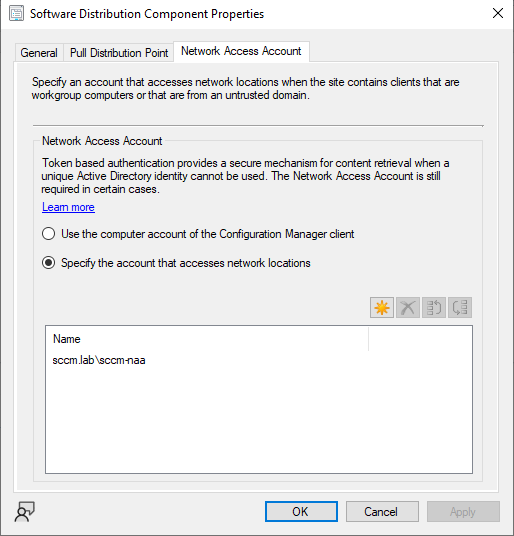
Network access accounts
It should be noted that while Microsoft has started recommending NOT to use NAAs and instead recommends using Enhanced HTTP (EHTTP), NAAs are still widely used, often with overly sensitive permissions like Domain Admin due to ease of use.
At rest, the NAA credentials are stored encrypted in the SCCM database using DPAPI. During deployment, they are embedded into client policy documents sent over HTTP(S). In practice these appear inside XML wrapped in CDATA blocks, flagged with markers like
Secret="1". SCCM must ship credentials down to a client in order for OSD to proceed and this is way it does that.Task Sequences
Task sequences are a core component of the automation step. In simple terms, a task sequence is a workflow that chains multiple steps together as one; think of it combining steps like disk partitioning, applying OS images, installing drivers, running PS setup scripts, installing specified apps or joining a machine to the domain.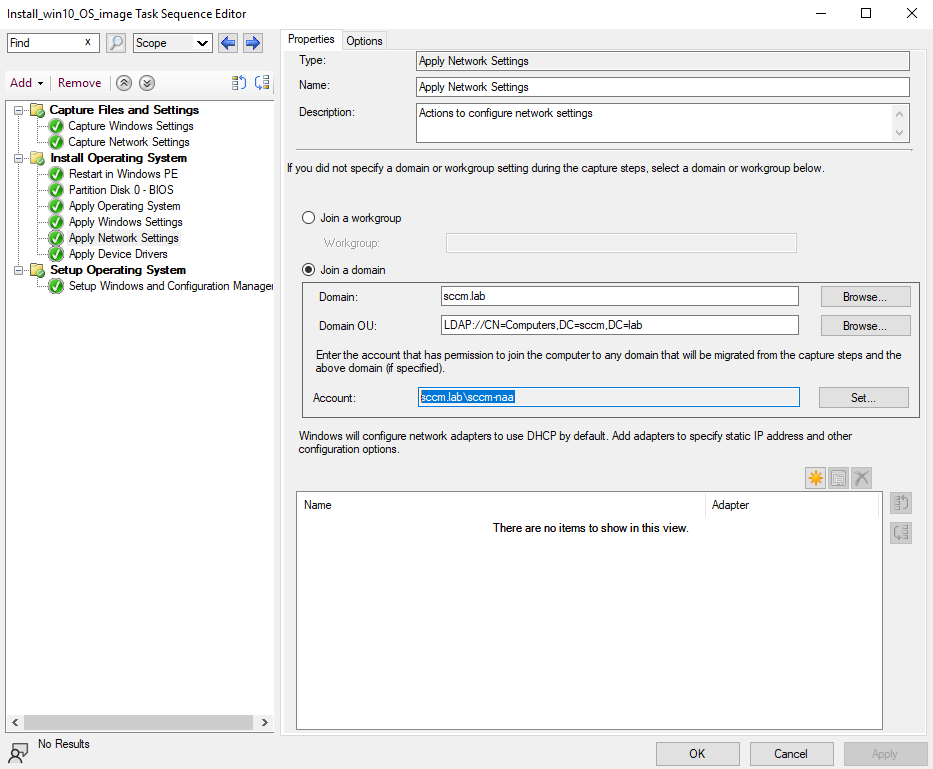
Windows 10 installation task sequences
From a protocol perspective, task sequences are delivered as policies over HTTP(S) from the Management Point (MP). Clients that boot into WinPE (via PXE or bootable media) reach out to their MP, sending their SMBIOS GUID/MAC, and request a list of available task sequences.
The MP replies with an initial policy — essentially XML that contains pointers to additional policies. The client then pulls those from the MP and DP and executes each step in order. This is a two-stage policy process; first a bootstrap, then the detailed workflow.
If one is assigned, the MP responds with an XML policy defining the sequence of actions to execute which the client will then pull via SMB or HTTP(S) and execute each step in order.
Since task sequences run with SYSTEM-level privileges, they represent one of the most powerful features of SCCM making it enticing for attackers. If this is misconfigured or an attacker gains access to the Configuration Manager, malicious code or scripts could be pushed to all machines.
Operating System Deployment (OSD)
OSD ties together everything above - collections, variables, NAAs and task seequences - into a single process; building a machine from bare metal. From a high level, the OSD workflow follows this pattern:1. Client boots (PXE, USB, or ISO).
2. WinPE loads, using an NAA if required to fetch content.
3. Client queries its MP, sending hardware identifiers.
4. MP responds with XML bootstrap policy listing available task sequences.
5. Client retrieves further task sequence policies and content (OS images, drivers, apps) from the DP.
6. Task sequence executes, installing and configuring the OS.
7. Device reboots into production OS and joins the domain (if configured).
What makes OSD important is that policy and credentials move back and forth during this process. Policies contain references to boot images, OS packages, apps, and sometimes embedded secrets (e.g. NAA or domain join accounts) that enable the automation.
PXE Boot in Detail
PXE booting under SCCM has two common modes: legacy WDS-based PXE and the newer PXE responder service. Both deliver the same end result with WinPE loading and connecting to the MP but the packet flow appears slightly different.In legacy mode, the PXE-enabled Distribution Point also runs Windows Deployment Services (WDS), acting as a ProxyDHCP service on
UDP/4011. A client broadcasts a DHCP Discover with Option 60 set to PXEClient. The DHCP server responds with an IP lease through Offer and ACK, while WDS replies separately on UDP/4011 with a ProxyDHCP Offer that includes Option 66 (Boot Server Hostname) and Option 67 (Bootfile Name). These fields usually reference smsboot\x64\wdsnbp.com in BIOS deployments or wdsmgfw.efi in UEFI deployments. The client then retrieves this Network Boot Program (NBP) over TFTP, followed by boot.sdi and the boot image boot.wim. Once WinPE is loaded, the system transitions from TFTP to HTTP(S) for further communication.In modern PXE responder mode, introduced with Server 2019 and later, Microsoft removed the dependency on WDS. In this case, the responder does not use Option 66 at all. Instead, the Bootfile Name (the equivalent of Option 67) is provided inside a PXE vendor-specific extension. Wireshark interprets this extension and still displays the Bootfile Name, but it is no longer encoded as a traditional DHCP option. From this point onward the boot process proceeds identically: the NBP is fetched via TFTP, WinPE initializes, and control shifts to HTTP(S).
When Secure Boot is enabled in UEFI mode, only signed NBPs such as wdsmgfw.efi are accepted and executed to ensure that an unsigned or tampered bootloader cannot be run. Once WinPE is running, it immediately posts a request to
/SMS_MP/.sms_pol containing the SMBIOS GUID and MAC address of the client. This request retrieves the task sequence policy specific to that endpoint. The client then downloads boot.wim and any additional referenced packages from the Distribution Point, switching from the SMS_DP_SMSPKG$ content share to HTTP(S). At this stage drivers, applications, and configuration items defined in the task sequence are pulled down and applied in order.A typical capture in Wireshark illustrates the flow clearly. When a bare-metal machine powers on and PXE boot is selected, the first thing you see on the wire is a DHCP Discover broadcast sent from 0.0.0.0 to 255.255.255.255. Inside the
BOOTP options you can expand Option 60, which contains the string PXEClient:Arch:00000:UNDI:002001 marking the request as a PXE boot from a BIOS-based client.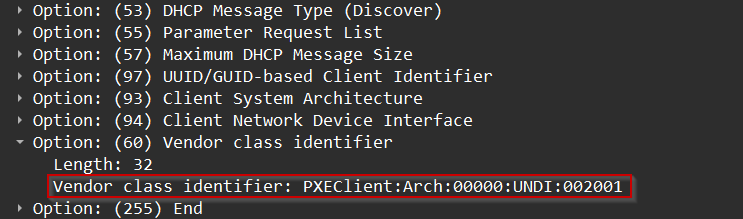
PXEClient vendor class identifier in DHCP packet
The DHCP server responds with a DHCP Offer proposing an IP lease and configuration. The PXE client then follows up with a DHCP Request (packet 448) explicitly asking to use the configuration offered by that server. This request includes Option 54 (DHCP Server Identifier) pointing to 192.168.32.10 (in my case). The DHCP server confirms with a DHCP ACK in packet 449, at which point the client has a valid IP address on the network.
AFter the handshake completes, PXE requires more information. The client still needs to know what boot file to fetch so this is where the PXE responder (WDS in legacy mode, or the modern PXE responder service) comes in with a ProxyDHCP exchange. In this capture, the PXE client sends a ProxyDHCP Request immediately after receiving its lease, and the responder replies with a ProxyDHCP ACK.
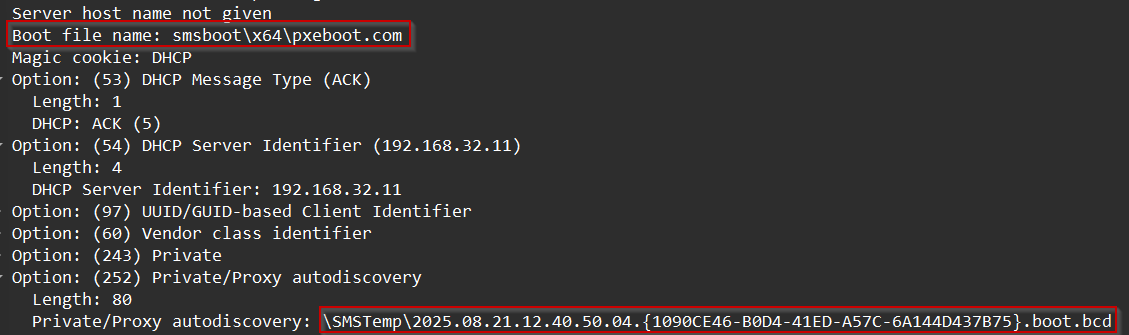
BCD file location under SMSTemp
In this case, the server provides the bootfile
smsboot\x64\pxeboot.com and a reference to the BCD configuration stored under \SMSTemp\…boot.bcd. These details confirm we are looking at legacy WDS-based PXE boot, where the Bootfile Name is delivered directly in the ProxyDHCP ACK.With this information, the PXE client knows the TFTP server and the initial Network Boot Program (NBP) it should load. Immediately after the ProxyDHCP ACK, the client issues a TFTP Read Request for that file. From this point the boot chain moves into the TFTP and WinPE stage of the workflow:

TFTP Read Request
PXE Session Files: .var and .boot.bcd
While you could see the\SMSTemp\{..}boot.bcd file above in the Wireshark capture, what actually is this file? Once the DHCP and ProxyDHCP exchanges complete, the PXE client knows what initial bootstrap program (NBP) to fetch. But in SCCM environments, the NBP is only the beginning - behind the scenes, the DP generates two critical files inside its
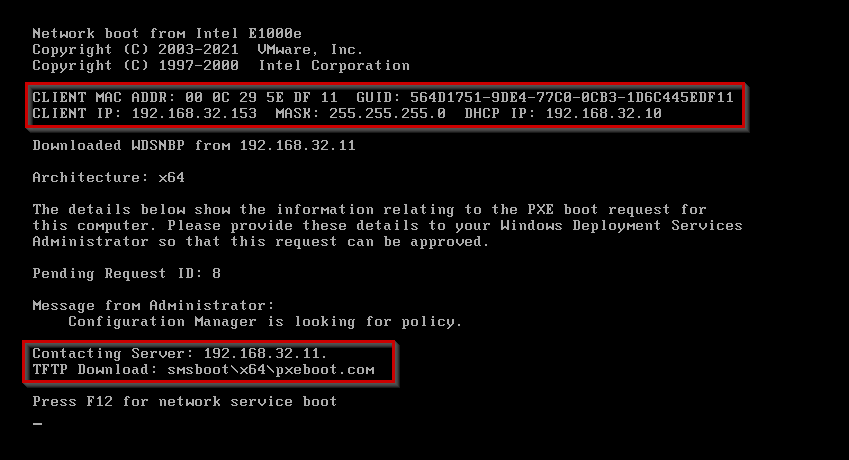
SMSTemp directory for each PXE boot session: a .var file and a .boot.bcd file. These are unique to the requesting client, tied to its SMBIOS GUID or MAC address, and together they determine exactly how the Operating System Deployment process will proceed.As a showcase, booting a new Windows 10 VM and allowing it to boot from the network, it first displays its MAC address and gains other information such as an address from DHCP, connects to the server, and various other bits of information:
TFTP Read Request
Navigating to the SMSTemp directory under
\\mecm.sccm.lab\REMINST\SMSTemp shows a newly generated .boot.bcd and .var file. These filenames don’t directly match the GUID displayed on the PXE boot splash screen, because SCCM generates a unique deployment identifier for each PXE session. Instead, the .var file acts as the bridge, containing the client’s SMBIOS GUID and MAC address, which ties the hardware identity of the booting machine to the staged .boot.bcd used to launch the task sequence.
Boot BCD and vars file created
Checking the log file
SMSPXE.log shows both the UUID and the string of the .boot.bcd and var files, tying them together: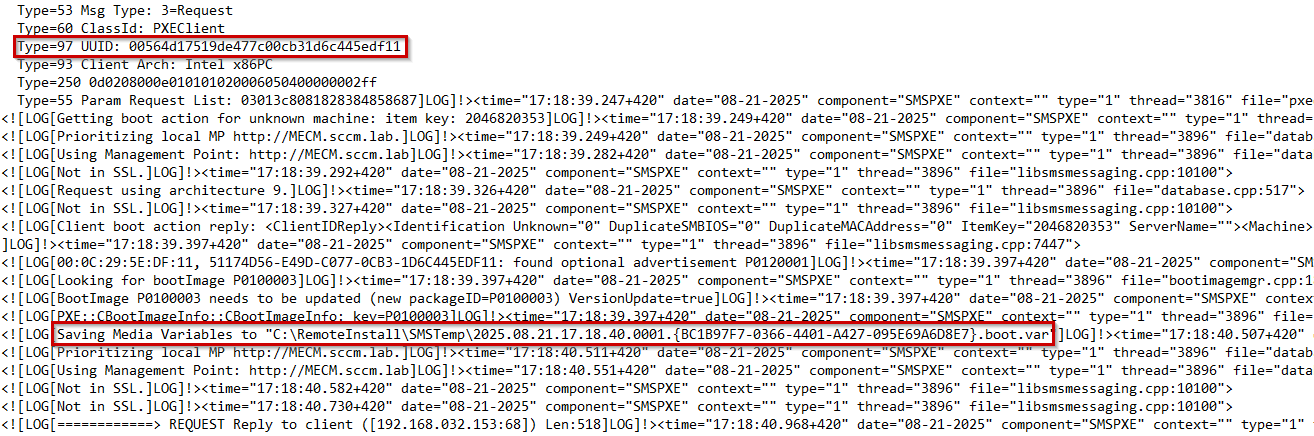
UUID & variables present within log
The
.var file functions as the client’s policy snapshot. It encodes which collection the device belongs to, which task sequences are visible to it, and any variables inherited from collections or advertisements. The file essentially bridges SCCM’s SQL-backed policy data and the ephemeral state of a PXE session. When a bare-metal device boots, SCCM needs a way to pass down environment-specific details and the .var file is that mechanism.Alongside it, the
.boot.bcd file provides the Boot Configuration Data store that the PXE client actually uses to launch WinPE. This file is dynamically generated for each session and contains entries pointing to the correct boot image (boot.wim) on the Distribution Point. It also encodes boot parameters, such as whether the client is BIOS or UEFI, what ramdisk options should be used, and any debugging or timeout flags. Without it, the client could fetch the NBP, but it would have no instructions on which WinPE image to load or how to run it.Further, WinPE is essentially Windows running inside a ram disk. Inside that drive is a specific folder -
sms - that contains all the binaries and configuration data it needs to boot and continue deployment. By using a command prompt inside the WinPE environment/booting process, we can see this - more specifically the TsBootShel.ini file:
TsBootShell.ini contents
This file defines the first command that is run inside WinPE. It also contains a reference to
TsmBootstrap.exe which is the configuration manager client inside WinPE - it's basically the window asking for a password. An additional parameter is also called alongside it for the config path which returns x:\sms\data where the variables.dat file is located: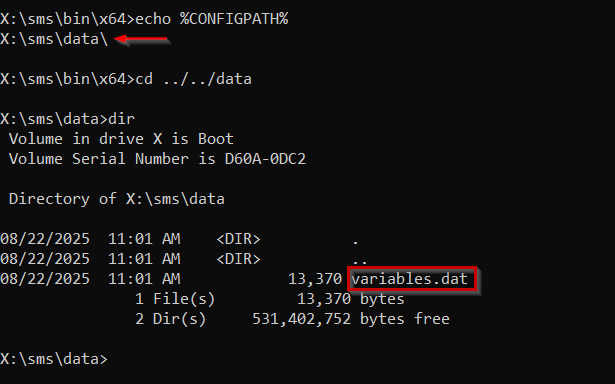
TsBootShell.ini contents
The
TsmBootstrap.exe file does all the DHCP stuff, pulls the .var file from SMSTemp over TFTP and renames it to variables.dat. In short, both files share the same timestamped prefix and GUID, linking them to the same PXE client request. The NBP instructs the client to download the .boot.bcd, which in turn points it to the WinPE image. Meanwhile, SCCM correlates the .var file to ensure that once WinPE is up, the client sees the correct set of task sequences in the deployment wizard.
References
1. Christopher Panayi - DEFCON30: Pulling Passwords out of Configuration Manager:DEF CON 30 - Pulling Passwords out of Configuration Manager
2. BHIS - SCCM Exploitation: The First Cred is the Deepest II:
BHIS - SCCM Exploitation Part II with Gabriel Prud'homme
3. Christopher Panayi - The State of SCCM Exploitation in 2024:
The State of SCCM Exploitation in 2024 - Christopher Panayi
4. Brandon Colley - Push Comes to Show: Exploring SCCM Attack Paths:
Push comes to shove: exploring SCCM attack paths