
Introduction
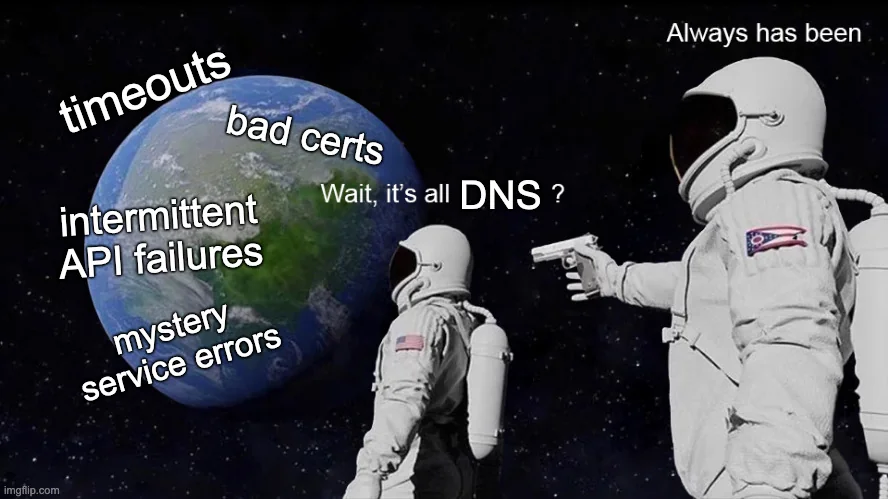
The labs in Part 1 and Part 2 got everything working in a local place - you can send emails, click links, capture credentials, and heavily customize the source code to make it more believable during your campaigns. But, in a real engagement, you won't typically be running it on a local device, but instead on a VPS and with a domain out there on the internet.Once you move to external infrastructure, things become a lot less "it just works" and a lot more screaming at your monitor, asking yourself why you don't just leave technology behind and become a farmer. You’ll spend more time figuring out why something isn’t working than actually building anything new and most of the time it ends up being DNS.
You’ll check everything else first, convince yourself it can’t be DNS, and then it turns out it is.
Emails might also not reliably land in inboxes, and you’ll start to see them filtered, flagged, or dropped entirely depending on how your setup looks. Depending on your choice of domain, these can also get picked up quickly if they seem suspicious, and even small details that feel slightly off tend to stand out far more than you’d expect.
In this post, we’re taking that same setup and putting it into a real environment. That means running GoPhish on a VPS, using a domain you control, and setting things up so emails can reach inboxes. There’s a bit more to think about now and it can be overwhelming at first especially around the mythical beast of DNS and how everything ties together, but once it’s in place it starts to feel a lot closer to how this works in practice.
Infrastructure Overview
Before installing anything, it helps to understand how everything is going to fit together. There are a few moving parts here, and if you start configuring things without that context, you'll likely end up debugging the wrong thing or getting confused early on.Rendering diagram...
At a high level, GoPhish is responsible for building the emails, sending them, and tracking what users do after they interact with them. It’s typically running on your VPS, but it isn’t exposed directly to the internet. A better method is configuring it so everything sits behind nginx, which is the only service handling incoming traffic.
When a user clicks a link from one of your emails, their browser connects to your domain, which points to the VPS. That request hits nginx first, which handles HTTPS and then forwards the request internally to GoPhish running on a local port. GoPhish serves the phishing page and records the interaction from there.
The admin panel for GoPhish also lives on the same VPS, but it should not be accessible publicly. For security reasons and OPSEC, it should be bound to localhost and only accessed over an SSH tunnel when needed.
Domain Registration
Before touching a VPS or a package manager, you need to register your domain.Email gateways and URL reputation systems will penalise domains registered within the past seven days heavily as newly created domains are often used for malicious intent. In some situations, corporate proxies will block any domain under two weeks old.
For a real engagement, it's a good idea for the domain to be aged and warmed up by serving real content, building sending history and getting submitted to categorisation portals. Typically, you might do this 3-4 weeks before the engagement, although I've seen a domain get registered 5-6 months before the test begins to be truly safe.
If you register a domain the day before you need it, deliverability will be poor regardless of how well everything else is configured. Since we are just learning, it's not too important here, but good to know for client engagements.
As for domain registrars, there are a number of options - Namecheap, Porkbun, and Cloudflare Registrar all work.
If you've been following along in this series, our local setup was using
rootsec.local - now we will pivot to a real domain I purchased through Cloudflare for the purpose of this series - o365-auth.com. The subdomain login.o365-auth.com will host the phishing page itself, mimicking login.microsoftonline.com.VPS Provisioning
Before setting anything up, you’ll need somewhere to host it. This can be any VPS provider, as long as you get a public IP and full control over the box.Most people default to the big cloud providers like Amazon Web Services, Microsoft Azure, or Google Cloud Platform. They’re easy to use and quick to deploy, but their IP ranges are very well known. A lot of email security platforms may keep a closer eye on traffic coming from these networks due to their consistent abuse by threat actors, which can make delivery a bit less reliable depending on how everything else is configured.
Providers like DigitalOcean or Linode sit somewhere in the middle. They’re still widely used, but tend to attract slightly less scrutiny and are usually cheaper and simpler to work with.
Then you’ve got smaller providers like OVHcloud or Hetzner. These are often the cheapest option, and in practice their IP space doesn’t always get treated the same way as the larger cloud providers. That can make things a bit smoother when you’re trying to get emails into inboxes rather than straight into junk, although it still comes down to how well everything is set up.
Now this is all from my perspective and personal experience - it's all entirely dependent on the client's setup and how they decide to filter domains and IP ranges. There is not a one-stop-shop solution that will work against every environment. For testing purposes, using a cheaper provider like OVHCloud in this case is fine and will do the job. In production, you'd want to measure the pros and cons of each provider and do the research to determine what might work best against your client.
VPS Setup & Hardening
If you decide to use OVHCloud, a model like VPS-1 or VPS-2 running Ubuntu 25.04 will work - at the time of writing this is available for £5.60 per month for a server hosted in France.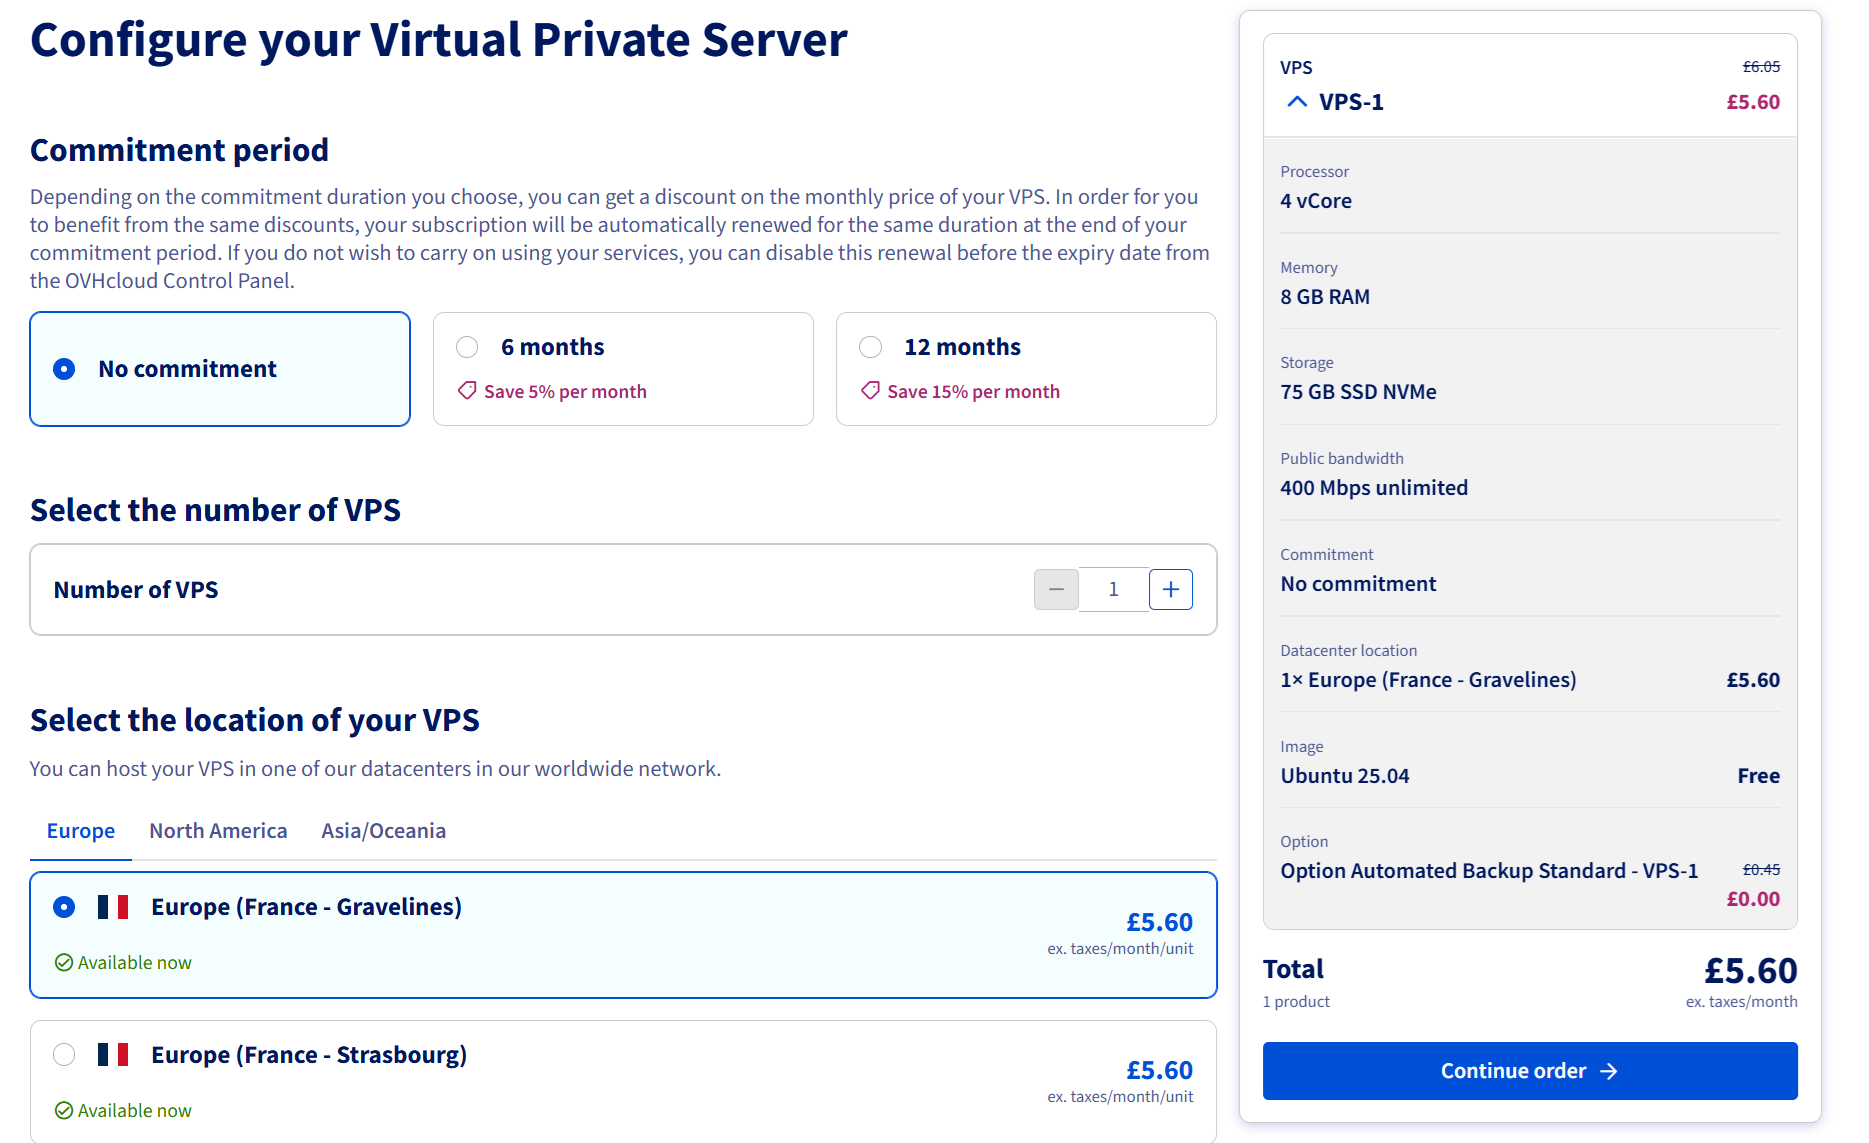
OVH VPS-1 pricing
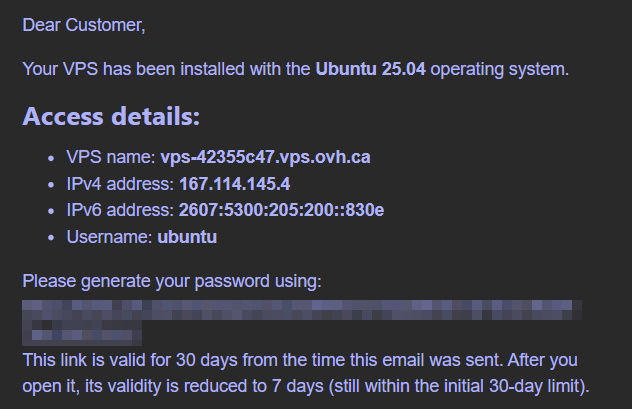
Bear in mind that you may need to reserve a server and have to wait a few days for it to be provisioned. In my case, I had to pre-order and wait up to 7 days. You will receive an email saying this. When provisioned, you'll receive an email providing your IP, username and a password to initially login.
VPS server details
Once you received this, your VPS is provisioned and you should be able to SSH over to it using the password you set:
bash
1ssh ubuntu@167.114.145.4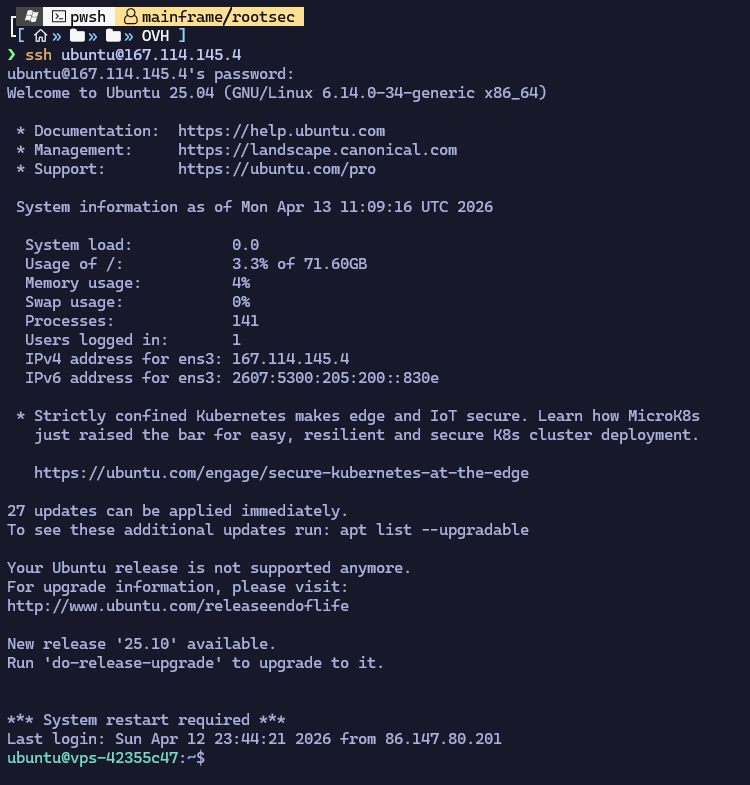
SSH access to VPS
Before delving into the phishing setup, there are a couple of steps I recommend before we forget including updating, setting the hostname, creating a different non-root user and hardening the SSH configuration.
First, it's a good idea to update and upgrade packages and set the hostname of the VPS to a sensible hostname such as a mail subdomain of your phishing domain (i.e. mail.o365-auth.com). For a little more security, I like creating a different non-root user rather than use the default ubuntu user and use an SSH key to login rather than a password.
bash
1# Update all packages
2apt update && apt upgrade -y
3
4# Set a sensible hostname — this value ends up in email Message-ID headers
5hostnamectl set-hostname mail.o365-auth.com
6
7# Create a non-root user for day-to-day use
8adduser fish
9usermod -aG sudo fish
10
11# Login as new user & generate SSH key
12ssh-keygen -t rsa -b 4096
13
14# Add public key to authorized_keys
15cat .ssh/id_rsa.pub >> .ssh/authorized_keys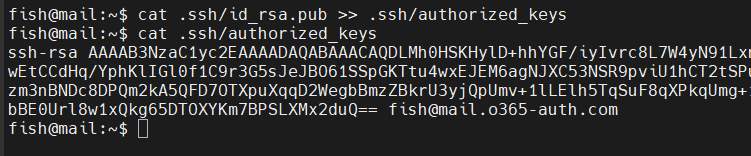
Authorized SSH keys
With the SSH key authentication set up, make sure it works before moving on or you may lock yourself out. Again, for security, it's not a good idea to keep the private SSH key (id_rsa) on the VPS - copy it off to your host machine via SCP and then remove it from the VPS. If you can SSH to the VPS using the key, then we can move on and secure SSH.
bash
1scp fish@167.114.145.4:/home/fish/.ssh/id_rsa .
2rm id_rsa
3
4ssh -i id_rsa fish@167.114.145.4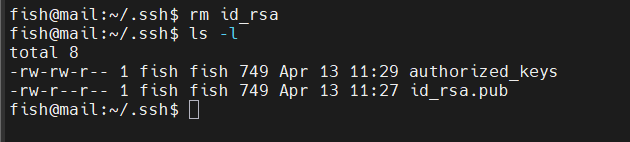
Private key removed
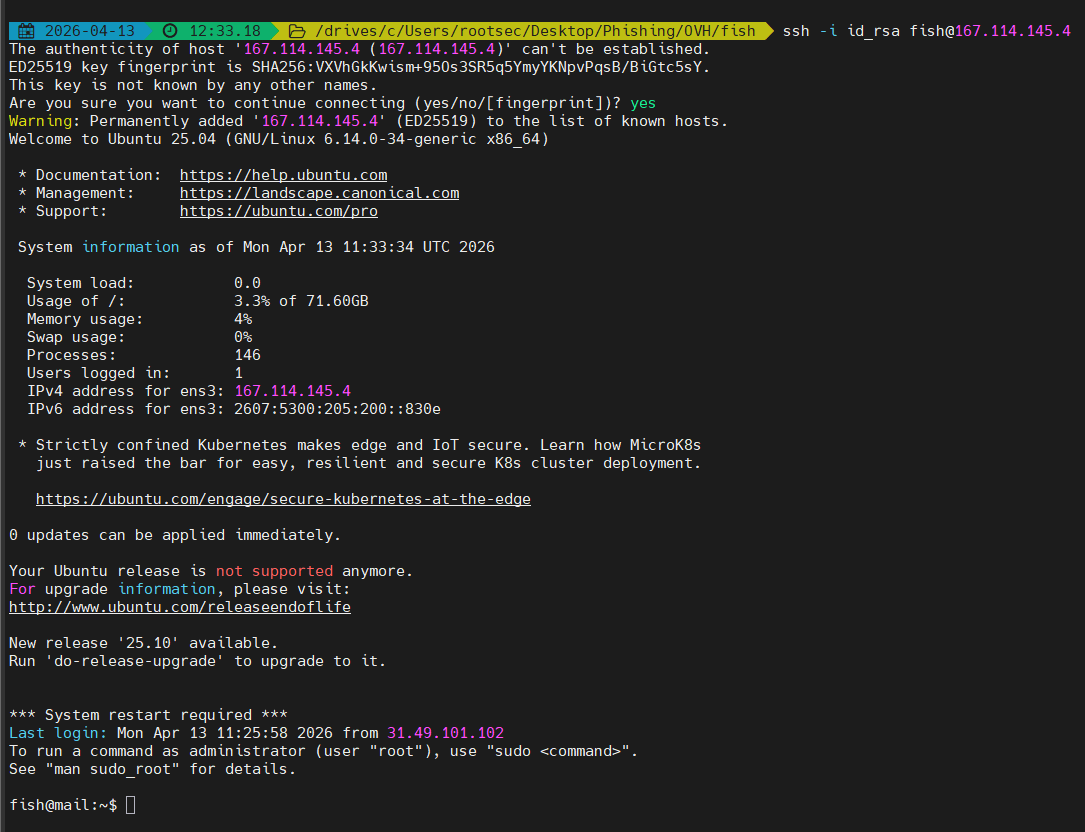
SSH access via id_rsa
SSH can be hardened further by disabling the ability for the root user to login over SSH and removing password authentication - requiring SSH private keys only for authentication. Once done, make sure to restart SSH.
bash
1sudo sed -i 's/^#\?PermitRootLogin.*/PermitRootLogin no/' /etc/ssh/sshd_config
2sudo sed -i 's/^#\?PasswordAuthentication.*/PasswordAuthentication no/' /etc/ssh/sshd_config
3sudo systemctl restart ssh
SSH hardening
The last part is optional, but it does add some more security. The default ubuntu user can be locked and then deleted, including their home directory so only our custom user (fish) can access this box.
bash
1# Lock and remove default ubuntu user
2sudo passwd -l ubuntu
3sudo deluser --remove-home ubuntu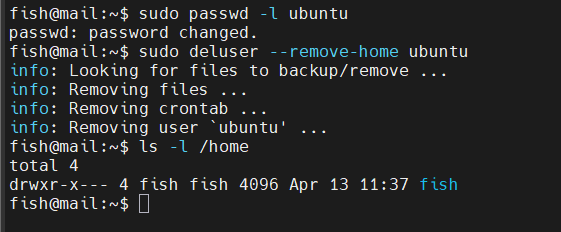
Removed ubuntu user
Finally, we can add some firewall rules to really lock down this machine. For example, we can add a default DENY rule that denies all incoming traffic and a default allow rule that allows all outgoing traffic. But in order to actually connect, we need to specify certain ports that are allowed to be accessed including port 22 (SSH), port 80 (GoPhish page) and port 443 (HTTPS page).
bash
1ufw default deny incoming
2ufw default allow outgoing
3ufw allow 22/tcp
4ufw allow 80/tcp
5ufw allow 443/tcp
6ufw enable
7ufw status verbose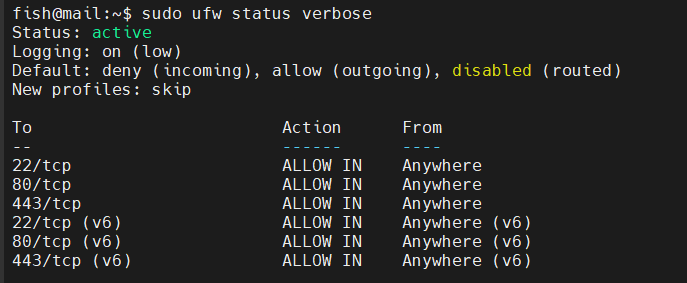
UFW active rules
An optional configuration is also to move SSH to a different port. Moving the port is not a substitute for key-based auth or other hardening measures, but it helps reduce the constant stream of noise in logs from automated scanners. You can change the port in
/etc/ssh/sshd_config and update UFW to match.Domain & DNS Setup
Once you have your domain and VPS setup, it's time to tame the wild beast of DNS. In order for us to tie our domain name to our VPS, we need to add some DNS records - once these are set up, you would submit your domain to vendor categorisation portals.Since this is a training series, we won't bother to do that but keep it in mind that it's an option. Vendors will typically visit the domain and make sure it matches the category you submit (i.e. does it look like an HR benefits portal?) and if it returns an error or a blank page, it will get rejected, placed in uncategorised or even marked as spam so you would set up a "decoy" page which is covered later with Nginx.
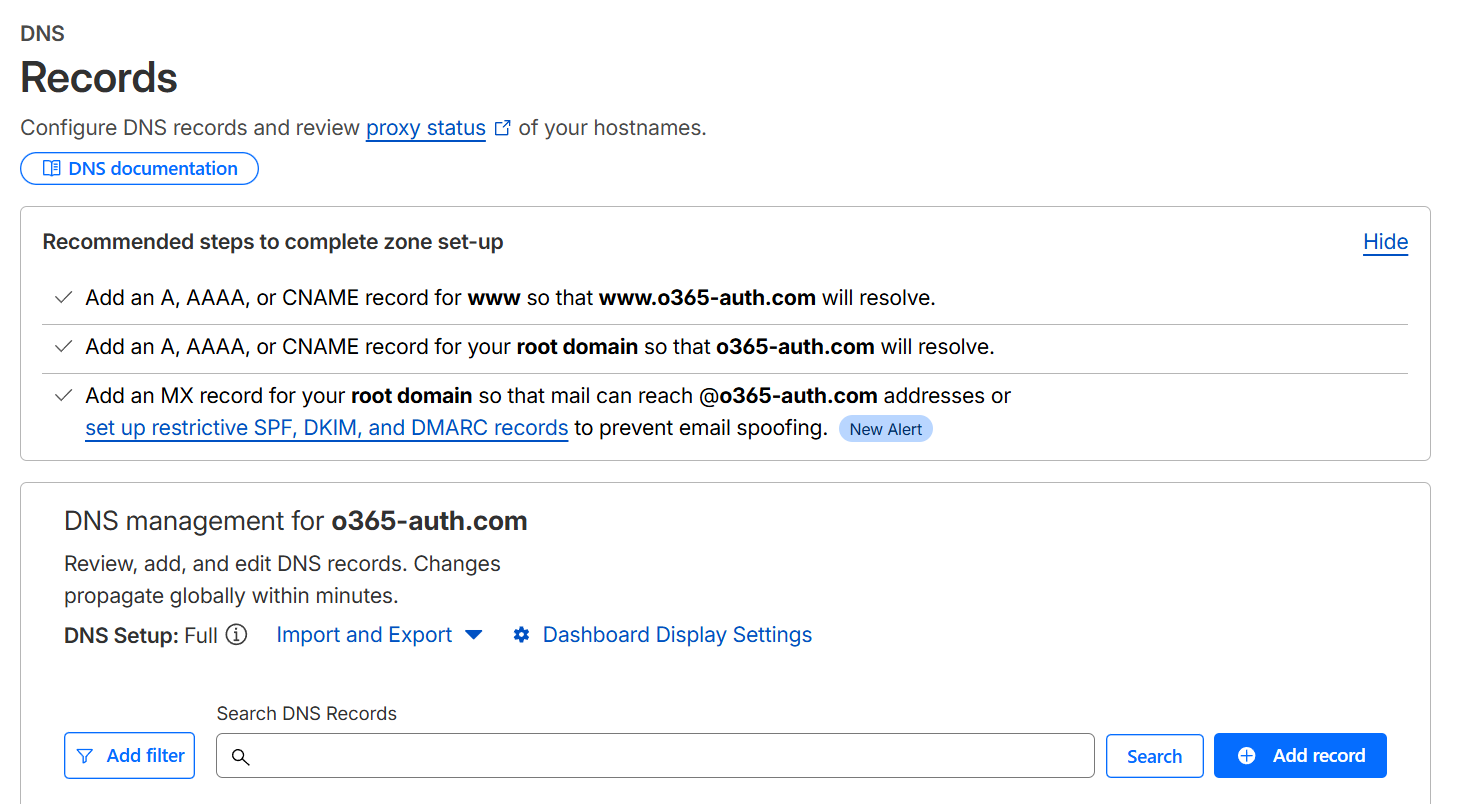
With that said, the first thing we do is point our apex domain and login subdomain (or your own subdomain) towards the VPS IP address. With Cloudflare, this is under Domains -> o365-auth.com -> DNS -> Records.
Cloudflare DNS records
Then, add the following records:
| Type | Name | Value | TTL |
|---|---|---|---|
| A | @ | 167.114.145.4 | 5 min |
| A | login | 167.114.145.4 | 5 min |
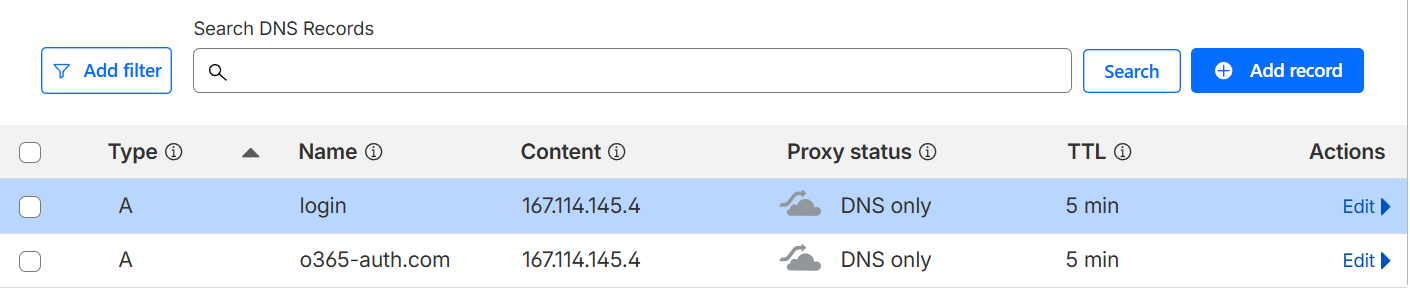
DNS A records
SPF Record
Next, we need to add an SPF record. Think of SPF as a guest list at a club. Your domain publishes a list of IP addresses that are allowed to send email on its behalf, and receiving mail servers check that list when an email arrives. If the sending IP isn't on the list, the email fails SPF and depending on the DMARC policy, it either gets flagged or dropped. Basically, without SPF, anyone can fire up a mail server and send an email claiming to be from your domain.To add an SPF record for our scenario, we can add the following:
bash
1Type:  TXT
2Name:  @
3Value: v=spf1 include:sparkpostmail.com ~all
4TTL:   300
The
~all at the end is a softfail meaning emails from unauthorised senders are marked suspicious but not outright rejected. Typically, I will start with this setting while getting everything configured as it can make it slightly easier to troubleshoot. Once it works, it should be changed to -all (hardfail), which tells receiving servers to reject anything not on the list.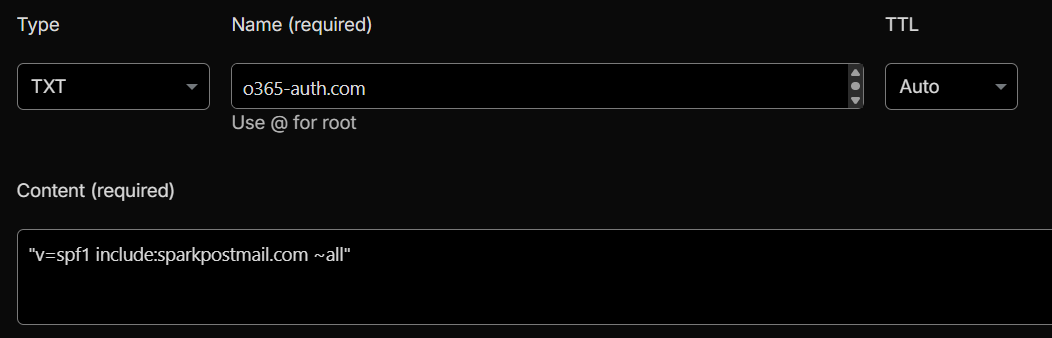
SPF record added
DKIM Record
Next up is a DKIM record. DKIM essentially verifies that the email wasn't tampered with in transit by having the sending server sign each email with a private key, and publishing the corresponding public key in DNS. When the receiving server gets the email, it looks up the public key and verifies the signature. If the signature matches, the email is proven to be exactly what was sent.Why do we need this for phishing server though? Well, the practical upside for us is that it's another positive trust signal that pushes emails toward inbox rather than spam, and it's required for DMARC to pass. Without DKIM, it's much more likely that email providers like Gmail and Outlook will be suspicious of you.
If you are using SparkPost, they will handle all the signing automatically once the domain is verified by adding a CNAME record pointing to their signing infrastructure. After you add your sending domain in the SparkPost dashboard (covered in the next section), they'll give you the exact record. It looks like this:
bash
1Type:  TXT
2Name:  scph0426._domainkey
3Value: v=DKIM1; k=rsa; p=<public key SparkPost generates for you>
4TTL:   300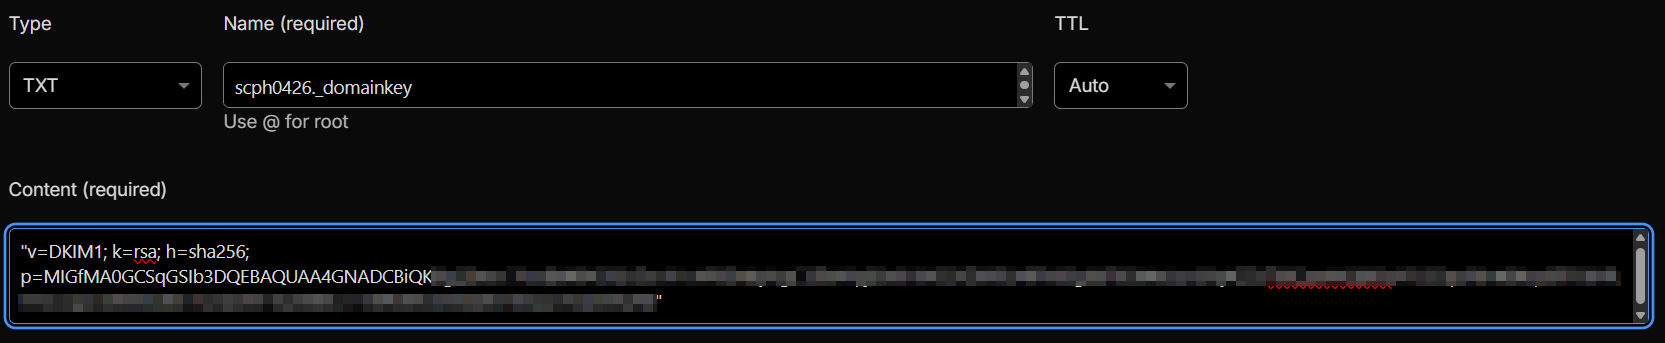
DKIM record added
DMARC Record
The final piece of the email DNS entries - DMARC. DMARC is basically the bouncer with instructions for what to do when either check fails. It ties SPF and DKIM together into a single policy and tells receiving mail servers "if something doesn't check out, here's what I want you to do about it (i.e. kick it out of the club)".For us, it improves deliverability as, typically, a domain with a DMARC record looks like a domain that is properly configured, and set up to operate professionally. It's also useful to diagnose misconfigurations as DMARC will send you XML reports from mail providers showing how emails are authenticating.
We can add our DMARC record as such:
bash
1Type:  TXT
2Name:  _dmarc
3Value: v=DMARC1; p=none; rua=mailto:dmarc-reports@o365-auth.com; ruf=mailto:dmarc-forensic@o365-auth.com; fo=1; adkim=r; aspf=r; pct=100;
4TTL:   300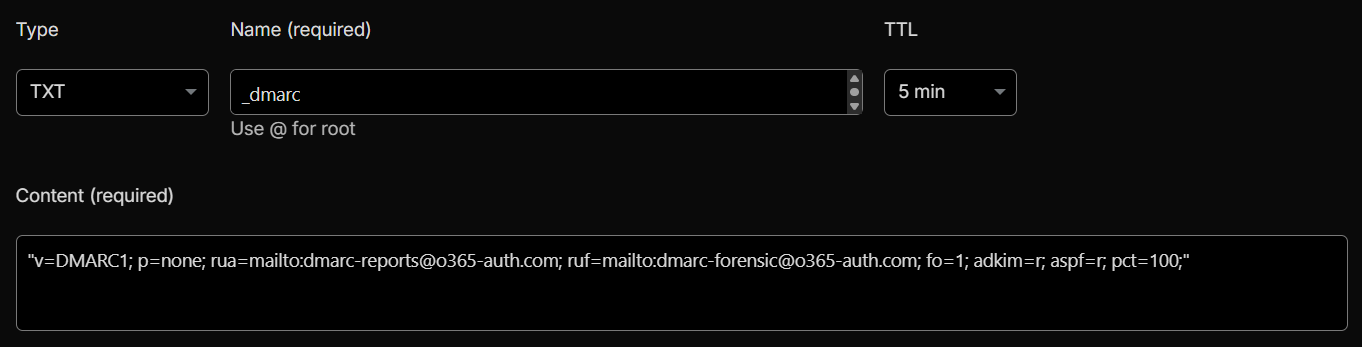
DMARC record added
If you're like me when I first started understanding DMARC records, you might be looking at all those flags and values and your brain starts frying. They are quick easy to understand when you break them down (hopefully):
p=none: monitor-only mode. Failing emails are reported but not rejected.rua: specifies the mailbox that receives aggregate reports. These are XML files sent periodically by receiving mail servers showing SPF/DKIM pass rates across all your sent mail.ruf: the mailbox for forensic reports, which contain details of individual failing messages.fo=1: generates a report if any single mechanism fails.adkim=randaspf=r: relaxed alignment for both DKIM and SPF. This means DMARC accepts mail where the signing domain is a subdomain of your domain, not only an exact match.
The
rua and ruf addresses only work if the domain can actually receive email which requires MX records we won't set up here since we are using SparkPost. To fix this, you can skip the self-hosted mailbox entirely and point rua at a free DMARC reporting service like Postmark or dmarcian. They receive the XML reports on your behalf.Verifying our DNS Records
Before moving on, we should verify that all our DNS records are set up correctly. Depending on your registrar/provider, the DNS records may take a while to propagate. In my experience, Cloudflare is generally quite fast and after a few minutes, the DNS records were propagated.We can query for the SPF, DKIM and DMARC records, as well as our A records
bash
1dig TXT o365-auth.com +short
2dig TXT scph0426._domainkey.o365-auth.com +short
3dig TXT _dmarc.o365-auth.com +short
4dig A o365-auth.com +short
5dig A login.o365-auth.com +short
Dig queries successful
SparkPost SMTP Relay
For sending out our emails, there are a number of options including running your own mail server via Postfix. However, the simplest way for learning is SparkPost which provides a managed relay to handle delivery from their IP space. One of the benefits of using a service like this is the IPs that recipient mail servers see belong to SparkPost and not your fresh VPS. If a brand-new IP with no sending history start spamming inboxes at your company, it will be scrutinised heavily and might not even make it through.Once you sign up for a free SparkPost account, go to Configuration -> Sending Domains -> Add Domain and enter your domain:
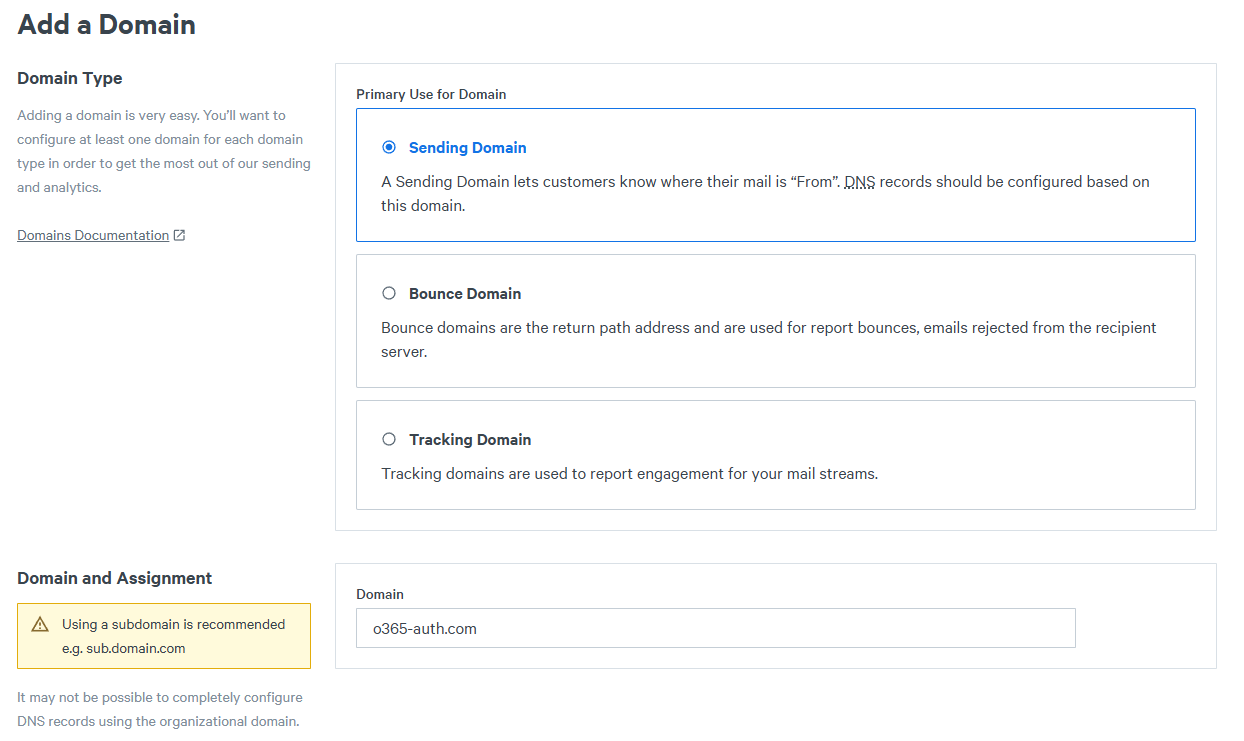
Adding domain to SparkPost
Once you hit Continue, you will be asked about domain alignment.
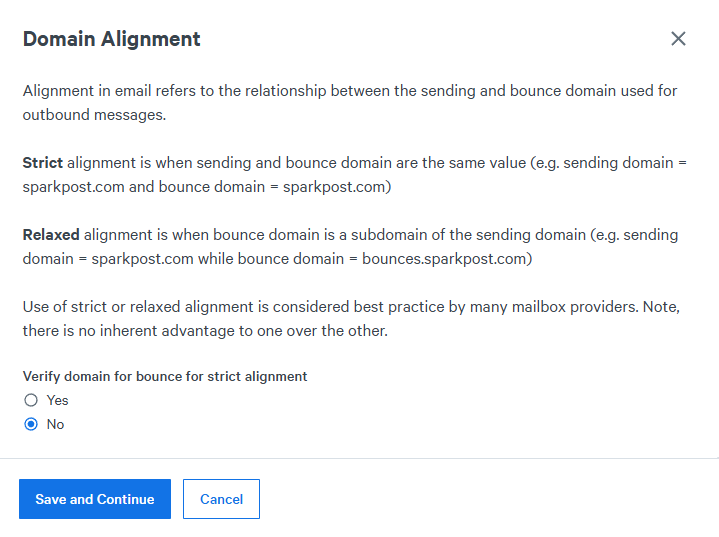
Domain alignment message
Strict bounce alignment means the return-path domain (the bounce address SparkPost uses) must exactly match your sending domain
o365-auth.com. SparkPost handles bounces through a subdomain of their own infrastructure, so strict alignment would require you to add an extra CNAME record pointing a bounces.o365-auth.com subdomain at SparkPost's bounce servers to pass verification.For our scenario, we gain nothing from it in this setup because the DMARC record already specifies
aspf=r for relaxed alignment meaning DMARC evaluates SPF against a subdomain match, not an exact match. Select No, click Save and Continue, and SparkPost will handle the bounce path with relaxed alignment, which is what your DMARC record expects. Next, it will ask you to verify the sending domain - this is the TXT record talked about above with the
scph key - copy these values and update your TXT record.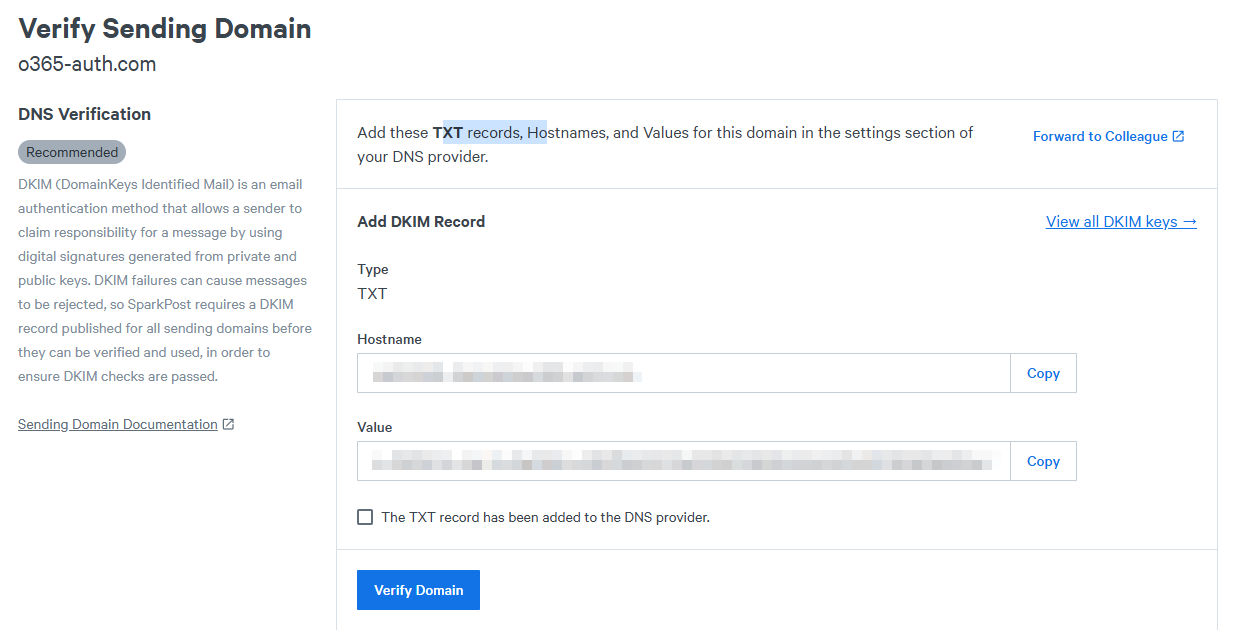
Domain verification
Once the record is added and DNS records have propagated, you should be able to successfully verify the domain.
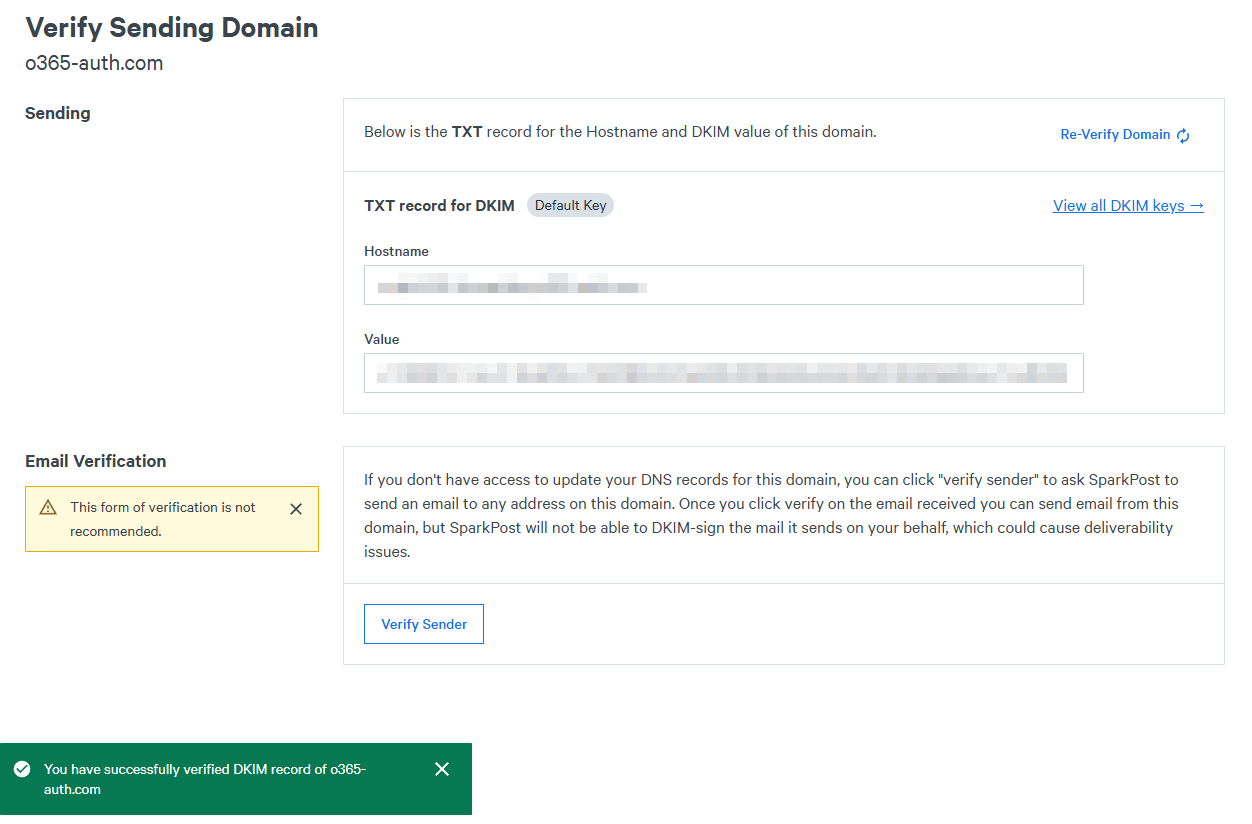
Domain verified
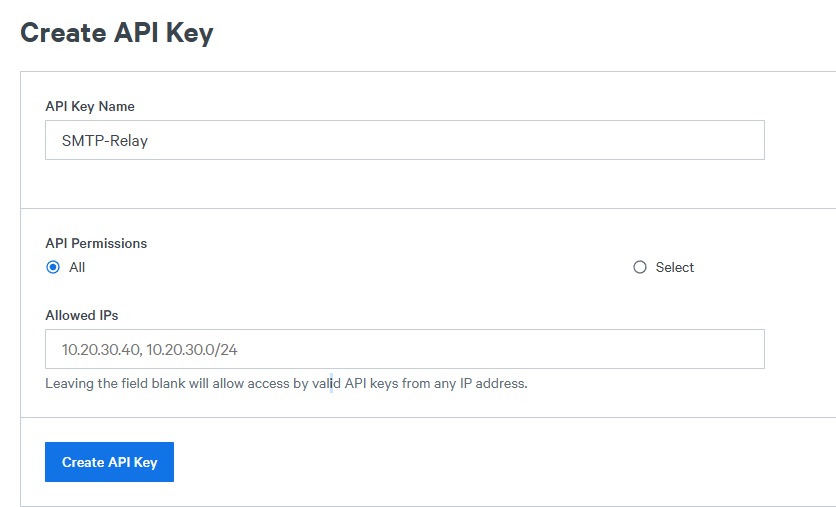
Next, we need an API key. For this, go to Configuration -> API Keys -> Create API Key) and name it something obvious like SMTP-Relay. You can customize the permissions to suit your needs, but if you do make sure "Send via SMTP" is checked at a minimum - for testing purposes, I have just allowed all permissions.
Create API key
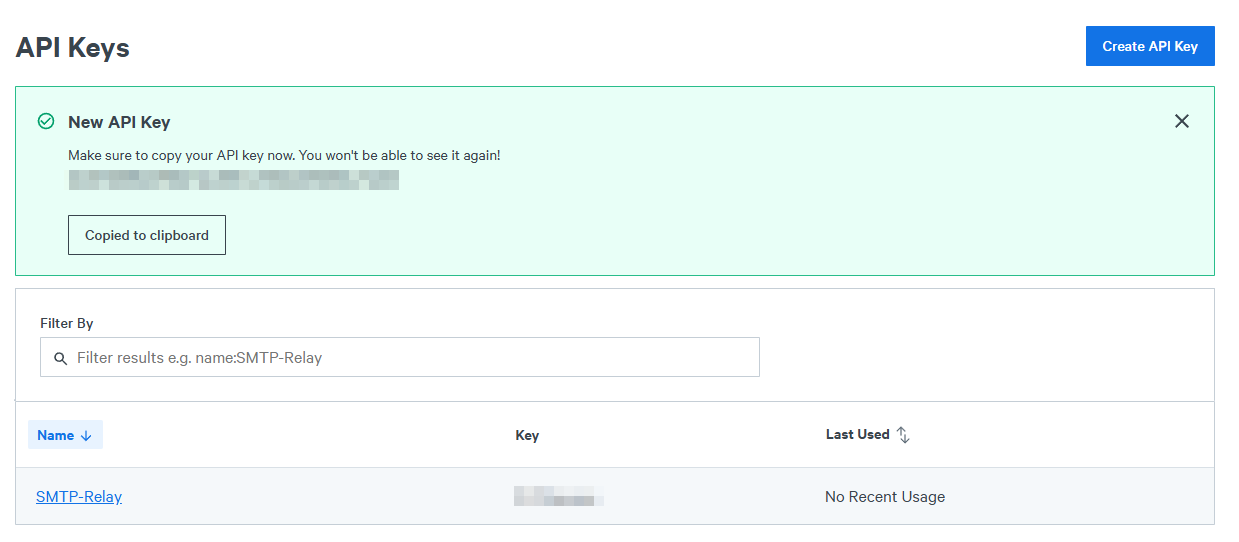
Once you create the key, copy it down as it's only shown once.
New API key
Now, if you click on your API key, you will see the various settings to configure the SMTP client to relay via SparkPost:
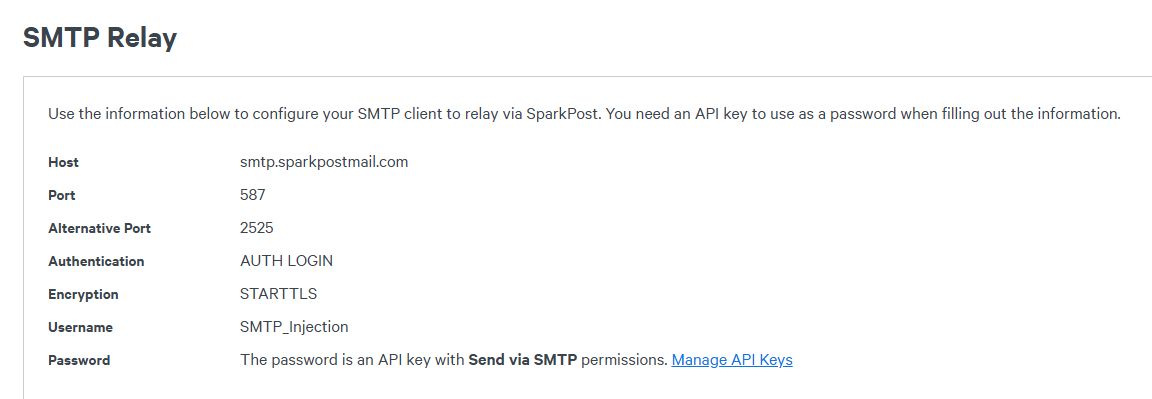
SMTP relay settings
These are as follows:
| Parameter | Value |
|---|---|
| Host | smtp.sparkpostmail.com |
| Port | 587 |
| Alt. Port | 2525 |
| Username | SMTP_Injection |
| Password | Your API key |
| Encryption | STARTTLS |
SMTP_Injection is fixed and the same for all SparkPost accounts. The password will be the API key you hopefully copied.
Now with it all set up, we can do a quick test to make sure emails get sent correctly using
swaks. For example:bash
1swaks --to jonathan@rootsec.me --from it-support@o365-auth.com --server smtp.sparkpostmail.com --port 587 --auth LOGIN --auth-user SMTP_Injection --auth-password '<YOUR_API_KEY>' --tls --header "Subject: SparkPost"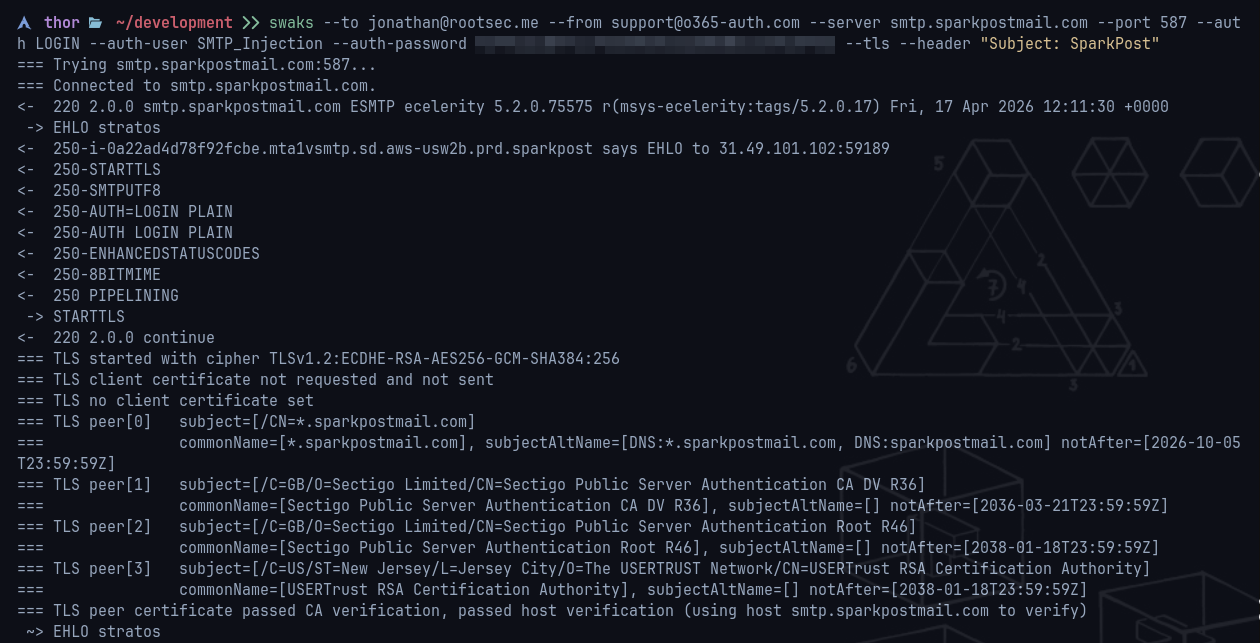
Swaks command
If successful, you should see an email appear in your testing email inbox from
support@o365-auth.com: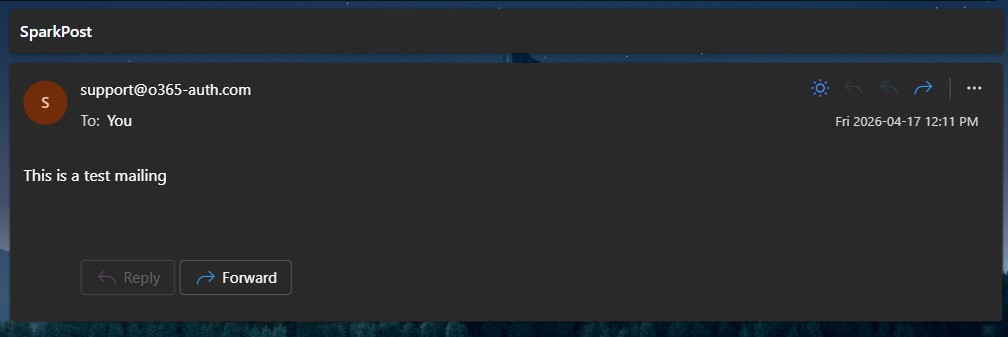
Email received in inbox
One thing to do - check the full headers on the received email. We should see SparkPost's infrastructure in the Received chain and not your VPS IP. There should also be a DKIM-Signature header with d=o365-auth.com.
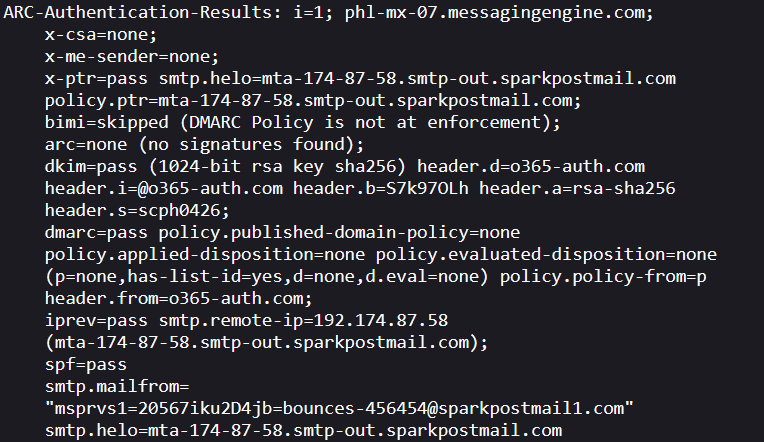
Email header checks
Scaling Up
Please note that SparkPost's free tier caps at 500 emails/month which is fine for this series, but might not be for a real engagement. If you require the ability to send hundreds of emails a day, you will need to consider this - some options are laid out below that are the most common.Paid relay (SparkPost, Amazon SES)
SparkPost's Starter plan (~$20/month) covers 50,000 emails/month which should cover most tests. If you're sending more than 50,000 emails in a red team, I'd be surprised! Amazon SES is another popular option - cheaper at $0.10 per 1000 emails plus ~$25/month for a dedicated IP with the benefit being AWS's sending infrastructure has strong reputation with most mail gateways.A problem with any shared relay though is terms of service. Most ESPs explicitly prohibit phishing simulation even on authorised engagements. SparkPost and SendGrid both have automated abuse detection that will suspend an account mid-campaign if bounce rates spike or content triggers filters. From personal experience, we've used a paid SendGrid option for a previous test, but sending out ~100 emails per hour triggered a system and we had to provide evidence/identification to continue that rate.
Self-hosted Postfix
For longer engagements or teams doing this regularly, running your own Postfix MTA on a dedicated IP might be better. However, I will warn you, getting this set up correctly without tearing out all your hair in the process is a challenge. For example, on a previous test, we spent a very long time getting Postfix to work correctly, spinning up different versions of Postfix and Ubuntu and not fixing it for weeks. You have been warned!The catch with custom mail servers is IP warming. A fresh IP blasting 1000 emails/day immediately will be flagged by every major gateway. You need to ramp up slowly, sending out legitimate looking emails weeks/months in advanced to gain that trust.
Multiple Sending Domains
At any larger volume, you might want to think about distributing 250-300 emails/day across different sending domains. If one domain gets flagged and blacklisted mid-campaign, the others keep running. For example, instead of sending 1000 emails fromsupport@o365-auth.com, you might split it into 4 domains:- o365-auth.com
- azure-support.com
- m365-helpdesk.com
- microsoft-portal.com